Spider plant root rot is one of the most preventable — and most devastating — problems the species faces. It develops when the soil stays wet for too long, suffocating the roots and creating the conditions for fungal and bacterial pathogens to take hold.
The plant’s thick, fleshy rhizomes that normally store water and support drought tolerance become the very tissue that decomposes when saturated.
By the time the symptoms are obvious to the eye, the root damage is already significant.
The good news: root rot is entirely preventable with correct watering technique, and it is treatable if caught early.
This guide covers how to identify it, how to treat it, and how to prevent it from recurring. For broader context on spider plant care generally, visit our spider plant care guide.
What Root Rot Actually Is
Root rot in spider plants is typically caused by two types of pathogens: Pythium and Phytophthora, which are water-mould fungi that thrive in wet, poorly aerated soil.
These pathogens attack the fine root hairs first — the delicate feeding roots that absorb water and nutrients — and then progress into the larger rhizomes.
As the root system degrades, the plant loses its ability to absorb water, which then manifests as wilting, yellowing leaves, and browning tips even though the soil appears moist.
The confusion between overwatering and root rot is what makes it so damaging. A spider plant with root rot often looks like it needs more water — the leaves droop, the plant looks tired — and the instinctive response is to water more. This makes the problem dramatically worse. The roots are already rotting in saturated soil; adding more water accelerates the process.
This is one of the most common ways houseplant root rot develops in general, and spider plants are particularly susceptible because their thick rhizomes hold so much water already.
How to Identify Root Rot in Spider Plants
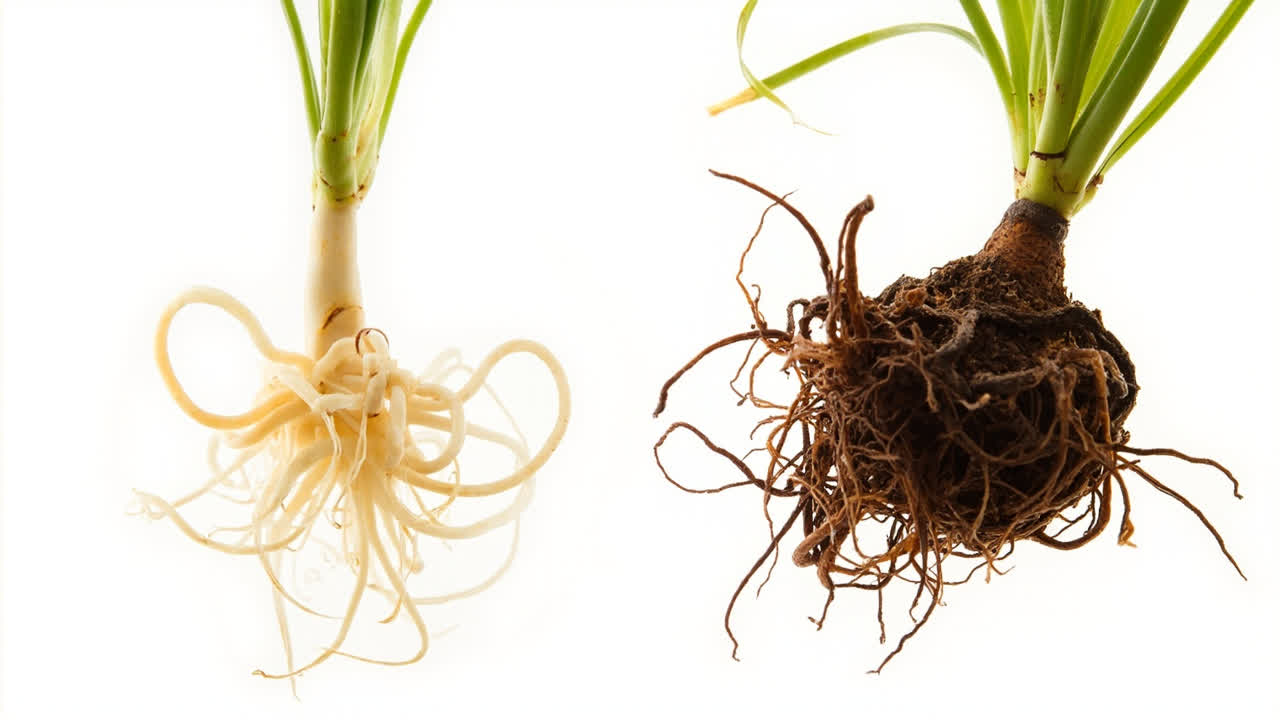
The most reliable indicator is checking the roots directly. Gently remove the plant from its pot — if the soil smells musty, sour, or like decay, that is a strong confirmation. Healthy spider plant roots and rhizomes are firm, white to cream-colored, and have a mild, earthy smell. Rotting roots are dark — brown to black — mushy, and have an unpleasant odor. The rhizomes feel soft and may collapse when squeezed.
Leaf symptoms that accompany root rot: the plant may look generally unwell even though the soil is moist. Leaves yellow starting from the base or older outer leaves and progress inward. Brown tips appear alongside the yellowing. The plant may wilt even though the soil is wet — this is the classic sign that roots are not absorbing water even though it is present in the soil. In severe cases, the base of the plant becomes soft and the entire rosette collapses.
There is a less obvious form of root rot that develops more slowly: the soil stays consistently damp but not saturated, and the fine roots die off gradually while the thick rhizomes survive longer. The plant declines slowly over months, with progressively yellowing leaves and stunted growth. This form is harder to catch early but is equally treatable once identified.
How to Treat Root Rot
Treatment requires removing all affected tissue and repotting in fresh, fast-draining medium. There is no rescue for fully rotted roots — if the entire root system is black and mushy, the plant may not recover even with intervention. If the majority of roots are still firm and white, the plant can recover.
Step 1: Remove the plant from its pot and shake off all soil. Rinse the root system gently with clean water to see the roots clearly.
Step 2: With clean, sharp scissors or a sharp knife, cut away every root that is dark, mushy, or smelly. Cut well above the affected area — do not leave any soft, discoloured tissue. If the rhizomes are affected, cut them back to firm, white tissue. It is better to remove too much than to leave partially affected roots that will continue to rot.
Step 3: Let the root system air-dry for a few hours before potting. This gives the cut surfaces to callous over, which reduces the risk of further infection when you pot it in fresh medium.
Step 4: Pot in a clean or new pot — or thoroughly sterilize the existing pot with a 10% bleach solution and rinse well. Use fresh, fast-draining potting mix: a standard all-purpose mix with perlite added at a 3:1 ratio, or a phalaenopsis orchid bark mix. Both drain fast and are inhospitable to the Pythium and Phytophthora organisms that cause root rot. Do not reuse the old soil.
Step 5: Water sparingly after repotting. The roots need time to regenerate fine root hairs before they can absorb water efficiently. Keep the soil lightly moist — not wet — and let the top inch dry out before watering again. Place in bright, indirect light and do not fertilize for at least a month.
Recovery takes four to eight weeks in most cases. You will know the plant is recovering when you see new growth — fresh green leaves emerging from the center of the rosette — and the existing leaves stop yellowing and browning at the tips. Once the plant is visibly recovering, return to a normal watering schedule based on soil moisture.
When Root Rot Has Gone Too Far
If the root system is completely destroyed — the entire rhizome is soft and black — the plant cannot be saved. In this case, examine the spiderettes on the long stems. If any spiderette has developed root nubs or roots, cut it free and propagate it in water or soil. You can save the genetic material of the plant even when the parent plant cannot be rescued. A single healthy spiderette can grow into a new, mature spider plant within a year or two.
Preventing Root Rot From Recurring
The only reliable prevention is proper watering technique. Spider plants need to dry out between waterings — the top inch of soil should be dry before you water again. This is not a suggestion; it is the fundamental condition that prevents the pathogens that cause root rot from establishing in the soil. A terracotta pot accelerates drying compared to plastic, which is helpful. A pot with plenty of drainage holes is essential. A well-draining potting mix is the third critical component.
Use filtered or distilled water if your tap water contains fluoride or chlorine, not because the chemicals cause root rot, but because brown tips from water quality issues can mask the early signs of root rot — you may not notice the plant is declining until the root damage is already present.
Avoid fertilizing heavily or frequently, because salt buildup in the soil can stress the roots and make them more susceptible to pathogen invasion. A spider plant fed at half strength once a month during the growing season is getting more than enough nutrition.
The Watering Habit That Prevents Root Rot
Establish a consistent watering habit: check the soil every few days, not just on a schedule. Insert your finger into the top inch of soil — if it feels dry, water thoroughly until it flows from the drainage hole. If it feels moist, wait another day or two and check again. In summer, this might mean watering every five days; in winter, it might mean watering every two to three weeks. The interval changes; the principle does not.
This single habit — watering based on soil moisture rather than a fixed calendar — is the most effective root rot prevention available for houseplants. Combine it with a fast-draining potting mix, a pot with drainage holes, and filtered water, and your spider plant will never encounter the conditions that allow root rot to establish.
Turn PDF Bank Statements Into Workable Spreadsheets
Your bank statement is a mess of numbers, but your books shouldn't be. Use our converter to get Excel, CSV, or QBO files — ready for QuickBooks.
Try It Free Now