
Root rot is the number one killer of indoor plants — and it’s almost entirely preventable worm castings house plants. Most plant parents don’t realize their plant is dying from root rot until 60–80% of the root system is already destroyed. The damage happens underground, out of sight, building slowly over weeks before visible symptoms appear above soil.
Root rot occurs when soil stays waterlogged long enough to create anaerobic conditions low light indoor plants. In oxygen-depleted soil, beneficial aerobic bacteria die and pathogenic fungi take over. These pathogens — primarily Pythium, Phytophthora, and Fusarium species — invade damaged root tissue, causing roots to turn brown, mushy, and incapable of absorbing water or nutrients. The irony: the plant shows symptoms of thirst (wilting, yellowing) even though the soil is wet, because the roots that should be absorbing water are already dead.
This guide covers the complete prevention system: watering technique, drainage optimization, pot selection, and soil mix improvement. Follow these steps and your plants will never die from overwatering again.
The Root Rot Mechanism: What Actually Happens Underground
Root rot is not a single disease — it’s a condition that enables multiple pathogens. The sequence matters:
Step 1: Overwatering or poor drainage creates waterlogged soil that stays wet for 5+ days after watering. This eliminates air pockets between soil particles, starving roots of atmospheric oxygen.
Step 2: Without oxygen, roots undergo hypoxic stress. Root tip growth stops. Root hairs — the primary water and nutrient absorption structures — die back within 48–72 hours of oxygen deprivation.
Step 3: Damaged root tissue releases exudates that attract Pythium and Phytophthora zoospores. These waterborne spores sense root damage chemicals and swim toward damaged tissue. One infected root fragment in a waterlogged pot can colonize the entire root system within 7–10 days.
Step 4: Pathogen colonies block water conduction through the vascular system. The plant wilts despite wet soil because water cannot move from roots to leaves through fungal-clogged xylem vessels. Simultaneously, roots turn brown, mushy, and disintegrate when touched — the classic diagnostic sign of advanced root rot.
Step 5: Above-ground symptoms appear: yellowing leaves starting from lower/older foliage, new growth stalling or dying, soft brown leaf edges, and eventual complete plant collapse. By the time these symptoms show, the root system is typically 60–80% destroyed.
Early Warning Signs: How to Catch Root Rot Before It’s Fatal
Root rot is reversible if caught early. The following warning signs appear 2–4 weeks before catastrophic damage:
Soil moisture persistence: Soil remains visibly wet 5+ days after watering in a 6-inch pot. In smaller pots, soil should dry within 2–3 days. If soil stays wet beyond this window, root function is already compromised. Use a moisture meter: readings above 7 (on a 1–10 scale) indicate excessive moisture for most house plants.
Odor change: Healthy soil smells earthy and mild. Root rot soil develops a musty, sour, or putrid smell — distinct from the sweet compost smell of healthy soil biome. If you notice the smell before visible symptoms, catch it early.
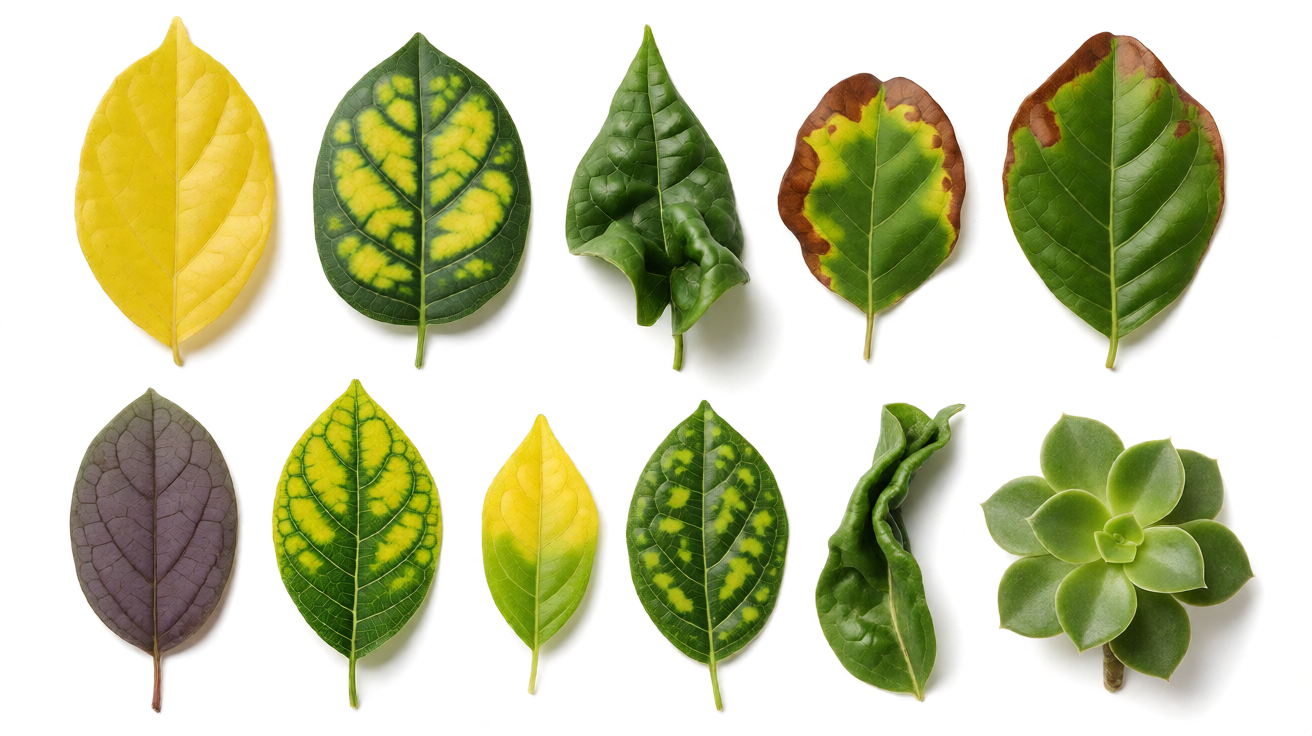
Yellowing pattern: Leaves yellow starting from the bottom of the plant and progress upward. This distinguishes root rot yellowing from nitrogen deficiency (which also yellows from bottom up) — root rot yellowing typically affects entire leaves quickly while nitrogen deficiency shows interveinal chlorosis first (green veins, yellow between).
Stunted new growth: New leaves emerge smaller than normal, may be pale green or yellow, and stop expanding. This indicates the root system is no longer supplying adequate water and nutrients to support normal growth.
Fungal surface indicators: White or gray web-like threads on the soil surface indicate mycelial growth. While not all white threads are pathogenic (some are beneficial fungi), persistent gray fuzzy growth is a warning sign. Remove the top inch of soil immediately if you see this.
How to Check Your Roots: The Hands-On Diagnostic
If your plant shows symptoms above soil, check the roots before doing anything else. Don’t water, don’t fertilize — inspect first.
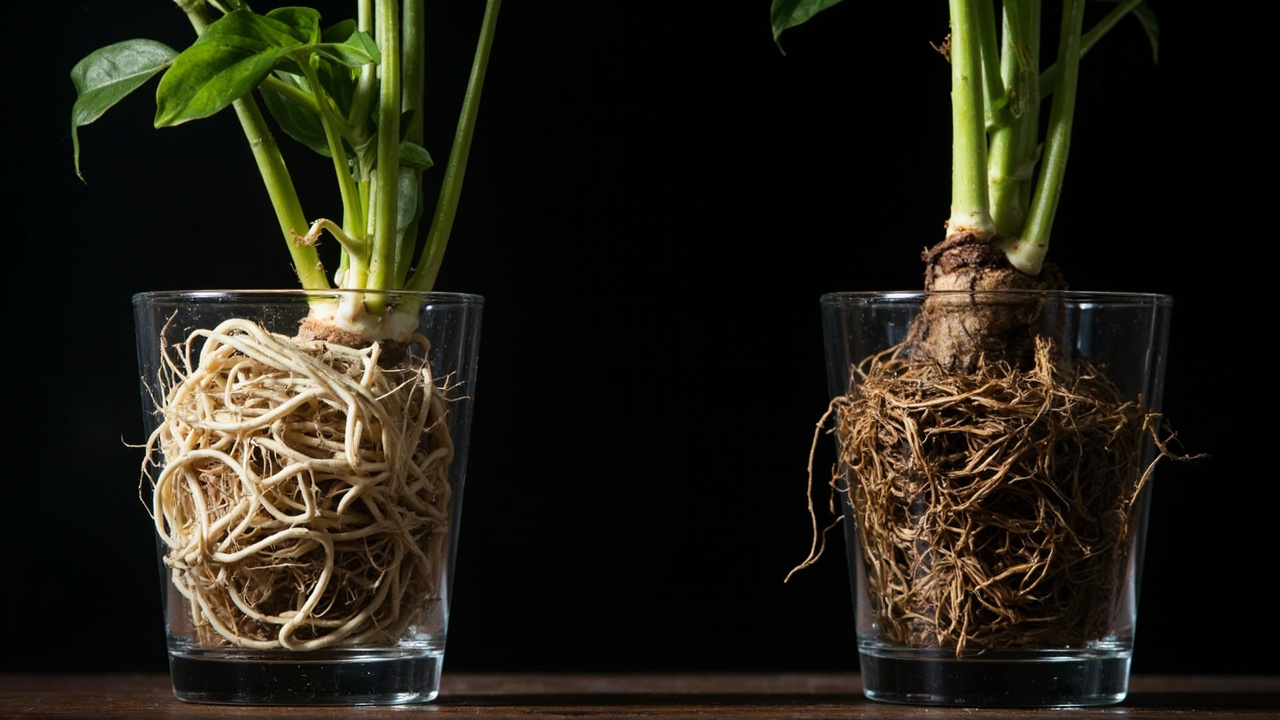
Turn the pot on its side and gently slide the plant out. Healthy roots vary by plant type but share common traits: they are firm when squeezed (not mushy), range from white to tan to light brown in color depending on species, branch repeatedly, and resist easy pulling apart. Roots should smell clean — like fresh soil or nothing at all.
Affected roots from root rot look dramatically different: they are brown to black in color, soft and mushy when squeezed (like a overcooked noodle), pull apart easily with no resistance, and may have a foul odor. When you pull on a rotting root, the outer layer slides off leaving only the inner string (a condition called “sloughing”). This is a definitive diagnostic for Pythium or Phytophthora infection.
Cut roots with sterilized scissors (wipe blades with rubbing alcohol between cuts) to see the internal color: healthy roots have a white or cream-colored core; rotting roots show brown or black discoloration extending through the root diameter.
Photograph the root system before pruning so you can track the severity and compare future inspections.
Fixing Active Root Rot: Can You Save the Plant?
If you catch root rot early — when less than 50% of the root system is affected — the plant can recover. Here’s the protocol:
Step 1: Remove the plant from the pot and gently shake off all soil from the roots. Do not reuse the soil — discard it completely and sanitize the pot with a 10% bleach solution if you plan to reuse it.
Step 2: With sterilized pruning scissors, cut away all brown, mushy, or smelly roots. Cut until you see white, firm tissue. Healthy roots may look sparse after removal — that’s expected. A plant with 30% healthy roots can recover faster than one with 70% infected roots that are actively spreading pathogen to the remaining healthy tissue.
Step 3: Rinse the remaining healthy root system gently with clean water to remove soil residue and any clinging pathogen spores. Add 1 tablespoon of 3% hydrogen peroxide per gallon of rinse water for extra pathogen kill.
Step 4: Repot in fresh, dry, fast-draining soil mix (see Soil Mix Optimization section below). Use a clean pot with drainage holes — same pot is fine if sterilized. Do not water immediately. Wait 3–5 days before the first watering to allow cut root ends to callous and reduce renewed infection risk.
Step 5: When you resume watering, use the soak-and-dry method exclusively. Water deeply until it flows from drainage holes, then do not water again until the top 2 inches of soil are completely dry. Use a moisture meter to confirm before watering.
Severe root rot (80%+ affected): Take cuttings from healthy stems immediately. Discard the parent plant — it will not recover. Root the cuttings in clean water or fresh perlite. Many common house plants (pothos, philodendron, monstera) root easily from stem cuttings, giving you a genetic copy of your plant to grow forward.
Prevention : Watering Technique: The Soak-and-Dry Method
The soak-and-dry method is the single most effective root rot prevention technique. It works for virtually all house plants except semi-aquatic species (cyperus, papyrus, peace lilies in their natural habitat).
The method: Water thoroughly until water flows freely from the drainage holes. This ensures the entire root zone is moistened — not just the top layer. Then do not water again until the top 1–2 inches of soil are completely dry. Insert your finger into the soil up to the second knuckle. If it feels damp, wait. If it feels dry, water.
Do not water on a fixed schedule. Plants don’t drink on schedules. A monstera in summer might need water every 5 days; the same plant in winter might need water every 14 days. Ambient humidity, temperature, pot material, and soil composition all affect drying time. Check soil moisture before every watering, not the calendar.
The exception to the finger test: succulents and cacti should dry completely (entire pot) before watering. For these plants, wait until the pot feels noticeably lighter when lifted, not just until the top soil is dry.
Prevention : Drainage and Pot Selection
Drainage holes are non-negotiable. Any pot without drainage holes will eventually cause root rot regardless of how carefully you water. If you love the look of a decorative cache pot without holes, use it as a outer sleeve — place the plant in a properly-drained nursery pot inside the decorative sleeve, and remove it to water.
Pot feet or risers elevate the pot above surfaces, allowing air circulation beneath the drainage holes. This prevents water from sitting in saucers and wicking back into the root zone. Raise pots at least 1/4 inch using pot feet, small wooden blocks, or a layer of pebbles in the saucer.
Pot material directly affects soil drying time:
- Terracotta: Porous walls allow air and moisture to evaporate through the pot walls. Soil dries 30–40% faster in terracotta versus plastic. Best for plants that prefer drying out (succulents, snake plants, zz plants) or for gardeners who tend to overwater.
- Plastic: Non-porous. Soil stays wet longer. Better for moisture-loving plants (ferns, peace lilies) or in low-humidity environments where soil dries too quickly.
- Ceramic (glazed): Like plastic but often with less drainage hole area. Choose glazed ceramic pots with at least two drainage holes of 1/2 inch or larger diameter.
Pot size matters more than most people realize. A plant in a pot too large for its root system holds excess soil that stays wet for too long. The correct pot size is 2 inches larger in diameter than the current root ball. When root-bound plants are transplanted into appropriately-sized pots, they dry out at the right rate and require watering at the correct frequency.
Prevention : Soil Mix Optimization
Soil mix is the foundation of drainage. Standard potting soil from garden centers retains too much moisture for most house plants because it’s designed for outdoor beds that drain freely. Optimize your mix:
Perlite addition: Add 20–30% perlite by volume to any standard potting mix. Perlite creates air pockets that improve drainage and oxygen availability to roots. Without perlite, standard peat-based mixes compress over time and become anaerobic even with drainage holes.
Avoid peat-only mixes: Peat retains water intensely and resists rehydration once fully dried. If peat dries out completely, it repels water and allows dry pockets where roots die. Never use straight peat as a growing medium.
DIY mix formula: Combine 60% quality potting soil + 30% perlite + 10% coarse sand or bark fines. This creates a mix that drains freely but still retains adequate moisture for healthy root function. Adjust perlite upward for succulents (50%+ perlite) and downward for moisture-loving tropicals (10–15% perlite).
Commercial mix alternatives: Look for “cactus and succulent mix” or “orchid bark mix” as base ingredients for high-drainage situations save dying orchid. These are formulated to be fast-draining and resist compaction.
Re-pot when soil degrades: over 12–18 months, organic components in soil mixes decompose, reducing pore space and drainage capacity. Refresh soil every year for fast-growing plants, every 2 years for slow growers.
Which Plants Are Most Susceptible to Root Rot
Some plants are inherently higher-risk for root rot due to their natural habitat. Knowing which category your plants fall into helps you adjust watering frequency and drainage accordingly.
High-risk plants (require fast-drying soil and careful watering):
- Succulents and cacti: Echeveria, aloe, haworthia, sedum — evolved in arid conditions with infrequent rainfall. Root systems are adapted to dry periods. Overwatering kills them fastest.
- Tropical thin-leaf plants: Calathea, Maranta, Prayer Plant — prefer consistent moisture but not saturation. They show root rot symptoms within days of overwatering because their fine root systems lack the structural defenses of thicker-rooted species.
- Peace lily (Spathiphyllum): Despite tolerating low light, peace lilies are susceptible to root rot if kept in standing water. Let them dry to 50% soil moisture before watering.
- Pothos and Philodendron: These are often considered “hardy” but root rot is the primary cause of pothos death in indoor settings. Despite tolerating neglect, they do not tolerate waterlogged soil.
Lower-risk plants (more forgiving of occasional overwatering):
- Snake plant (Sansevieria/Dracaena trifasciata): Evolved in dry, rocky African habitats. Stores water in leaves and rhizomes. Can survive weeks without water and tolerates occasional overwatering better than most.
- ZZ plant (Zamioculcas zamiifolia): Has underground rhizomes that store water. Designed for drought. Root rot occurs only after 2+ weeks of waterlogged soil.
- Cast iron plant (Aspidistra): Native to forest floors with low light and dry conditions. One of the most tolerant house plants for low-water situations.
Apply these risk levels to your watering schedule. High-risk plants should be watered when the top 2 inches of soil are dry. Lower-risk plants can wait until the entire pot is dry or the plant shows mild wilt.
Trade-offs: Root Rot Prevention Requires Attention
Root rot prevention is not a one-time fix — it requires ongoing attention to your watering habits and plant signals. There is no “set and forget” solution for indoor plant care, despite what plant shop salespeople might suggest.
The time investment is small: 30 seconds to check soil moisture before watering, once every 5–14 days depending on plant type and season. This 30-second check prevents the 30-minute emergency repotting session when root rot takes hold.
Once you master the soak-and-dry method and understand your plants’ drying cycles, your indoor plant survival rate improves dramatically. Most experienced indoor gardeners report losing fewer than 5% of plants to root rot after adopting consistent moisture monitoring. The key is consistency — not perfection.
For plants showing early stress signs, read our guide on how to save a dying plant which covers diagnosis and recovery for multiple stress types including root rot. For watering technique fundamentals, see our guide on how to water house plants properly. If you suspect over-fertilization is contributing to root issues, check our article on over-fertilization signs. For specific care of high-risk species like Calathea, see our calathea care guide which covers the humidity and moisture balance these sensitive plants require. And for mass cane (Dracaena fragrans) — a species prone to root rot in overwatered conditions — our mass cane care guide covers the specific watering thresholds that keep this popular plant thriving.
Turn That PDF Into a Spreadsheet in Minutes
You've seen how to do it manually — now let the tool handle the heavy lifting. Upload your bank statement and get Excel, CSV, or QBO in a few clicks.