Microgreens mold usually starts when a tray is too wet, too crowded, too warm, or too stagnant after germination. A little fuzz does not always mean mold, though. Young roots can produce fine white root hairs that look alarming if you have never seen them before.
The first job is diagnosis. Root hairs appear close to the root, look even and delicate, and disappear when misted. Mold often spreads across the medium or stems, looks webby or patchy, and may come with a sour smell. When the crop is food, uncertainty deserves caution.
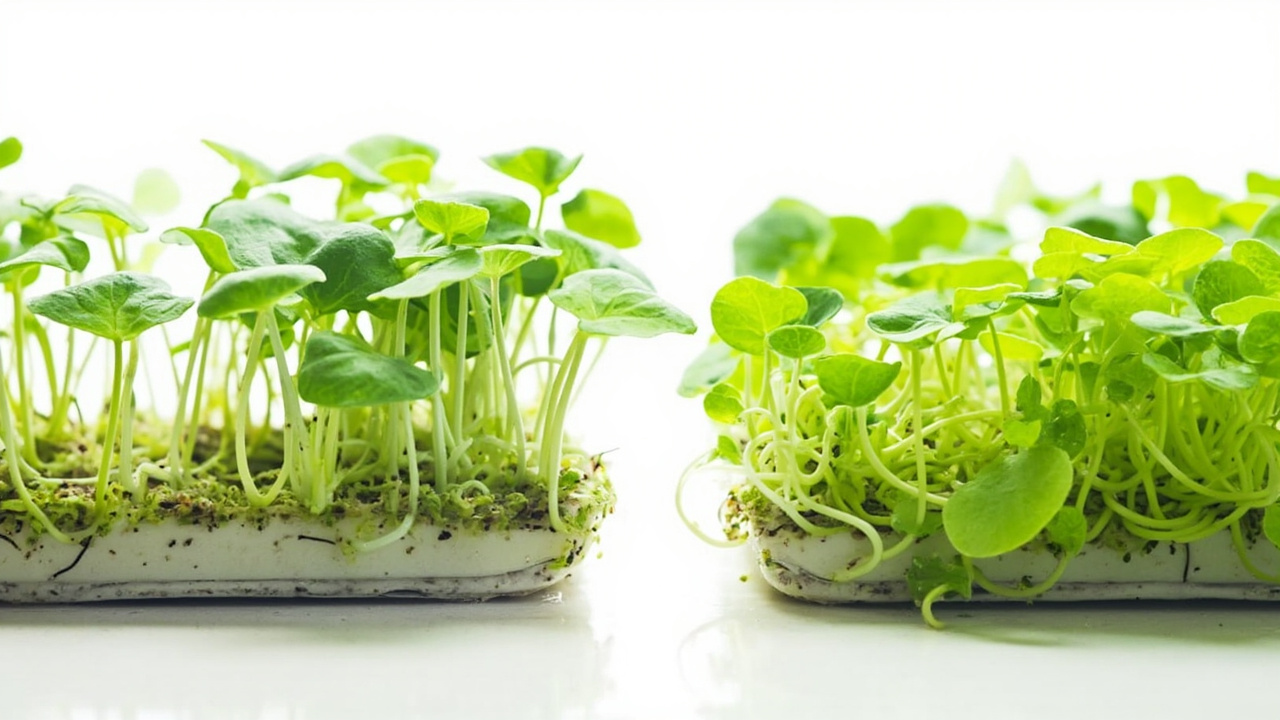
Mold Or Root Hairs
Some crops in the microgreens seeds guide show root hairs more clearly than others. Radish, broccoli, and other quick brassicas can produce white fuzz around the root zone shortly after germination. If the fuzz is only at the roots and vanishes after a light mist, it is likely root hairs.
Mold behaves differently. It spreads across seed hulls, medium, and stems instead of staying neatly around roots. It may look gray, cottony, or web-like. It often appears in damp pockets where seed was too dense or the cover stayed on too long. A stale or sour smell is a warning sign, not a normal stage.
Why Mold Starts In Microgreens
Most mold cases start with the moisture pattern covered in the microgreens watering guide. Seedlings need moisture to germinate, but dense trays leave very little space for air once stems rise. If the surface stays wet and the canopy closes, mold has the conditions it needs.
Four causes usually stack together: seed sown too thick, a blackout cover left on too long, weak airflow, and a medium that stays wet below the surface. One of those factors may not ruin a tray. Two or three together often do.
Light also matters because weak seedlings stretch and fall into each other. A collapsed canopy traps more humidity than upright stems.
What To Do With A Moldy Tray
Cleaning starts with the container, especially reusable microgreens trays. With edible crops, do not treat mold as a cosmetic issue.
- If mold is widespread, compost the tray rather than trying to save it.
- If you are unsure whether it is mold or root hairs, do not serve it to vulnerable people.
- Wash trays with hot soapy water and let them dry fully before reuse.
- Remove old seed hulls and root mats completely.
- Start the next tray with lower seed density and earlier uncovering.
The honest trade-off is that discarding a tray feels wasteful, but eating from a questionable tray is not worth the harvest.
Fix The Medium And Airflow
A dense or soggy microgreens growing medium keeps the root zone wet too long. Use a thinner layer, avoid pressing it into a slab, and make sure the tray drains. About half an inch of loose medium is enough for many quick crops.
Airflow should be gentle, not blasting. The goal is to prevent stagnant humidity over the tray. A small room fan nearby, an uncovered tray after germination, or more space between trays can help. If the medium is still wet two days after watering, airflow alone will not solve the problem; the watering volume or medium depth also needs to change.
Light Problems That Look Like Moisture Problems
Weak light can create the damp canopy described in microgreens light requirements. When seedlings stretch, they lean, tangle, and shade the surface. That makes the tray dry unevenly and keeps the lower stems humid.
If mold keeps appearing even after you water less, check the light. A bright, close, even source keeps stems shorter and the canopy more open. It also helps the surface dry at a healthier pace after bottom watering.
The Next Tray Checklist
- Sow a thinner, even seed layer.
- Uncover as soon as seedlings lift and push the cover.
- Switch to bottom watering after germination.
- Drain standing water after 10 to 20 minutes.
- Improve light and gentle airflow.
- Clean trays fully between crops.
If the next tray smells fresh, stands upright, and dries slightly at the surface between waterings, you fixed the conditions that mold was using.