Over fertilization is one of the most common and most misdiagnosed problems in home gardening. The early signs — yellow leaf tips, brown crispy edges, wilting — look like nutrient deficiency, so most gardeners respond by adding more fertilizer. That pushes the plant past recovery.
The real difference is in the pattern: over-fertilized plants scorch from the leaf edges inward, while deficiencies show from the center outward. A white or grayish crust on the soil surface is concentrated salt residue — a clear signal the root zone is overloaded.
Fertilizer burn develops over hours to days after feeding, not weeks. If your plant looked fine two days ago and suddenly looks terrible the morning after a fertilizer application, burn is almost certainly the culprit. The damage shows up quickly after feeding. If you scrape that crust away and the layer beneath looks powdery white, your plant is sitting in a salt bath.
This guide walks through every sign of over-fertilization from earliest to most advanced, explains the mechanism behind salt toxicity, and gives a step-by-step recovery process that works for both container plants and garden beds.
Why Over Fertilization Happens (The Root Cause)
All fertilizers — whether synthetic granules, liquid feeds, or organic compost — are essentially salt-based. Plants absorb nutrients as dissolved ions in water, and that process depends on osmosis. Under normal conditions, water moves from the soil into the roots because the root cells have a higher solute concentration than the surrounding soil.
When fertilizer concentration in the soil exceeds what the roots can handle, that gradient flips. Water moves out of the roots and into the soil through reverse osmosis. The plant literally dehydrates while sitting in wet soil. That’s why over-fertilized plants wilt even when the soil is damp — the roots can’t take up water anymore.
Synthetic fertilizers cause this problem faster because they release nutrients all at once in a highly concentrated form. A single application of 10-10-10 granules can spike soil salt levels dramatically within hours. Organic options like compost or worm castings as natural fertilizer break down gradually over weeks, which gives the plant time to absorb what it needs and lets excess wash away between feedings.
7 Clear Signs Your Plant Has Too Much Fertilizer
Not sure if you’ve overdone it? Here are seven symptoms that almost always point to fertilizer burn, listed from easiest to spot to the most serious.
1. White Crust on the Soil Surface
A white, grayish, or yellowish crust forming on top of the soil is accumulated salt from fertilizer. It’s most visible on the edges of pots where water evaporates and leaves minerals behind. You might also see it as a ring around the base of the plant. This is the earliest and most reliable sign — and it means salt concentration is already high enough to damage roots.
2. Brown or Yellow Leaf Tips and Margins
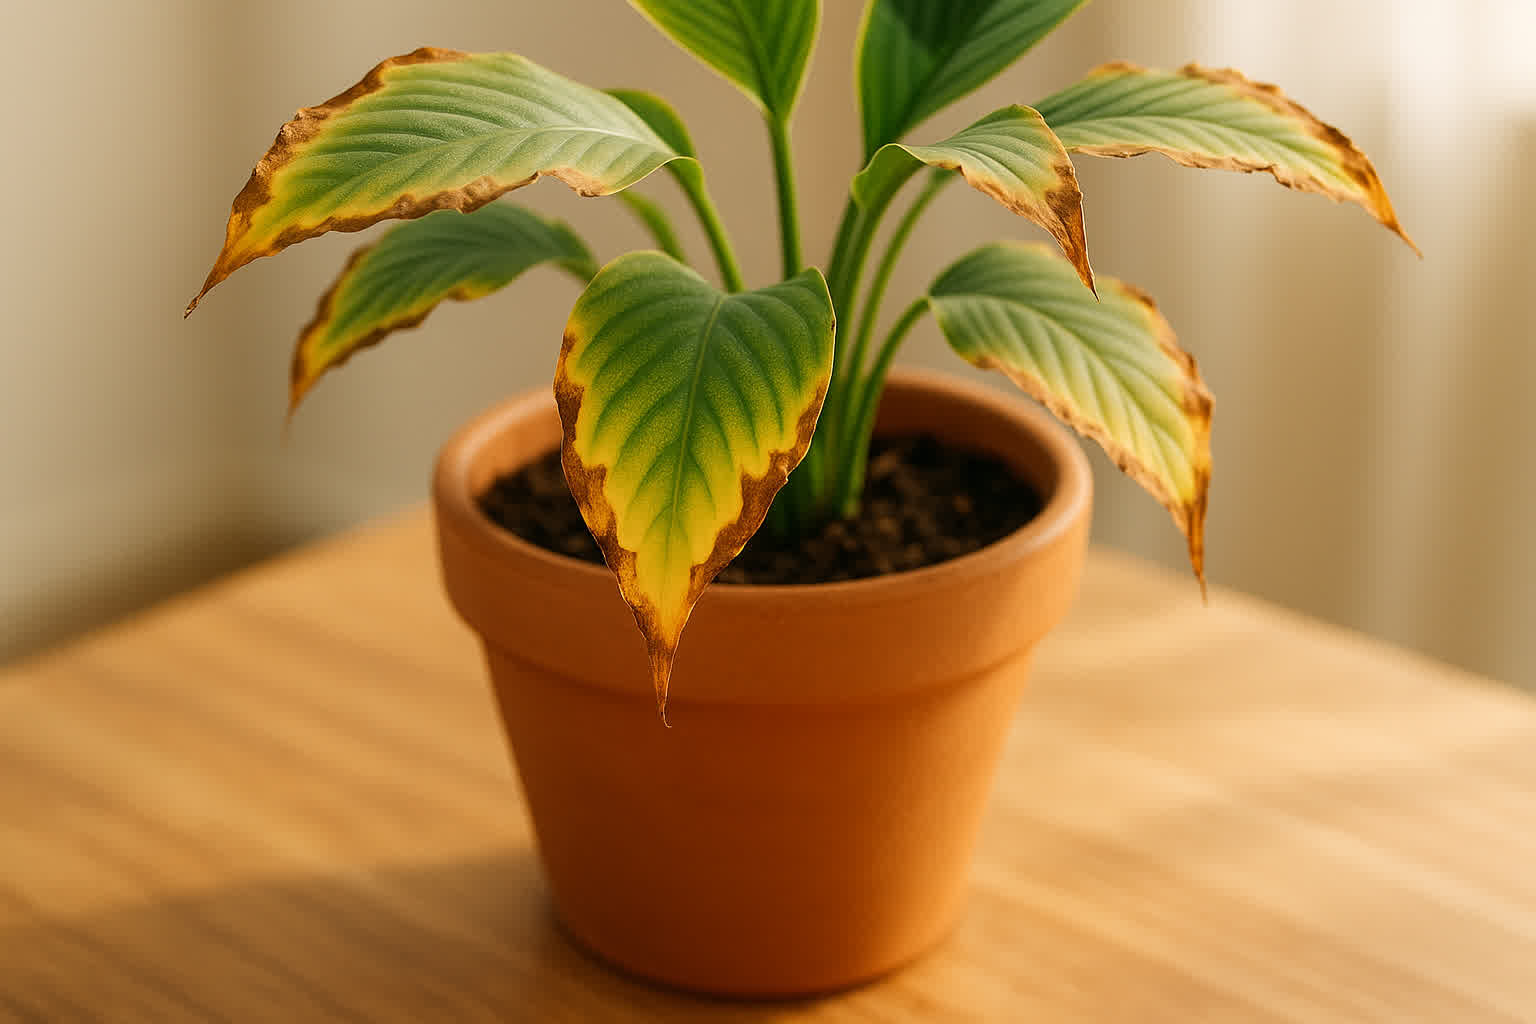
Unlike nutrient deficiency (which causes uniform yellowing or interveinal chlorosis), fertilizer burn starts at the very tips and edges of leaves and works inward. The affected tissue looks dry, crispy, and sometimes has a yellow “halo” between healthy green tissue and the brown edge. It’s the plant equivalent of a chemical burn.
3. Wilting Despite Wet Soil
This one confuses almost every gardener. The soil is clearly moist, but the plant droops like it hasn’t been watered in weeks. That’s the osmotic effect in action — the roots are surrounded by water they physically cannot absorb because the salt concentration outside is higher than inside. The more you water without flushing the salts, the worse it gets.
4. Stunted or Twisted New Growth
Excess nitrogen is the usual suspect here. Too much nitrogen pushes the plant into rapid, abnormal growth that comes out deformed — curled leaves, thickened stems, or new leaves that are smaller and darker green than they should be. In seedlings, this shows up as leggy, weak stems that can’t support themselves.
5. Root Tips Turn Brown or Black
Healthy root tips are white or cream-colored. Over-fertilized roots turn brown, black, or mushy at the tips because the salt literally burns the root tissue. If you unpot the plant and the outer root mass looks dark and slimy while the inner roots are still okay, the damage is progressing from the outside in.
6. Leaves Dropping From the Bottom Up
The plant is shedding its oldest leaves first because it’s under extreme stress and redirecting resources to new growth. Unlike normal seasonal leaf drop (which is gradual and affects a few leaves at a time), fertilizer burn causes rapid defoliation. You might lose 5-10 leaves in a week from a plant that normally drops one per month.
7. Slow Drainage and Water Pooling on Top
High salt concentrations change soil structure. The soil particles become coated in minerals and can actually repel water — a condition called hydrophobic soil. You’ll notice water sitting on the surface for a long time before slowly draining, or running down the sides of the pot without actually wetting the root ball. This means the soil can’t do its job anymore.
Which Plants Are Most Vulnerable to Fertilizer Burn
Some plants can shrug off heavy feeding. Others will die from a single overdose. The difference usually comes down to root mass, growth rate, and pot size.
Seedlings and young plants have underdeveloped root systems that can’t process concentrated nutrients. Fertilizing seedlings before they develop their first set of true leaves is one of the fastest ways to kill them. Wait until they have 3-4 true leaves, then use no more than quarter-strength fertilizer.
Indoor plants in small pots are highly vulnerable because there’s very little soil volume to dilute the salt concentration. A 4-inch pot with a single teaspoon of granular fertilizer has a much higher salt-to-soil ratio than the same amount in a 12-inch pot. Plants like African violets, calatheas, and peace lilies are especially sensitive.
Succulents and cacti evolved in nutrient-poor environments and have extremely low fertilizer needs. Even half-strength feeding can burn them if applied too often. These plants need feeding only 2-3 times per year, at quarter strength at most.
Orchids have fine, sensitive roots that burn easily. Standard orchid fertilizer should be diluted to half or quarter of the label recommendation, especially during hot weather when water evaporates faster and salt concentrates more quickly.
Low-light plants — those kept in dim corners or north-facing windows — use nutrients much slower than plants in bright light. Fertilizing them at the same rate as your sun-loving plants leads to salt buildup because they simply don’t consume the nutrients fast enough.
The most resilient plants? Large outdoor specimens in garden beds with good drainage. The massive soil volume dilutes fertilizer naturally, rainfall flushes excess salts, and the larger root system can handle temporary concentration spikes.
How to Fix Over Fertilized Plants (Step by Step)
If you’ve caught the problem early, most plants recover fully within 4-6 weeks. Here’s exactly what to do.
Step 1: Stop Fertilizing Immediately
This seems obvious, but it’s worth stating: put the fertilizer down and walk away. No more feeding until the plant has fully recovered, which takes at least 4-6 weeks from the day you flush the soil. Mark the date on your calendar so you don’t forget and accidentally feed again too soon.
Step 2: Flush the Soil With Plenty of Water
This is the most important step. Run 3-4 times the pot’s volume of water through the soil to dissolve and wash away the excess salts. For a standard 6-inch pot, that means pouring roughly 1.5-2 liters of water through slowly, letting it drain completely between pours. Use room-temperature water — cold water shocks stressed roots. If the plant is outdoors, you can leave it under a gentle rain for a few hours, which is even better than tap water.
Step 3: Remove Visible Salt Crust From the Surface
Scrape off the top 1-2 centimeters of soil where the white crust has formed. Replace it with fresh, unfertilized potting mix. Don’t just stir the crust into the soil — that redistributes the salt deeper into the root zone where it’s harder to flush out.
Step 4: Check That Drainage Is Working
Make sure the pot’s drainage holes aren’t blocked by compacted soil, roots, or debris. If water isn’t flowing freely out the bottom, the flush won’t work and salts will just accumulate further. If the soil has become hydrophobic, you may need to gently break up the surface crust or even repot into fresh soil if the condition is severe.
Step 5: Trim Severely Damaged Leaves
Leaves that are more than 50% brown or crispy won’t recover and are just draining the plant’s energy. Remove them with clean scissors or pruning shears. Leave any leaf that still has mostly green tissue — the plant can photosynthesize with partial leaves and will drop them when it’s ready.
Step 6: Move the Plant to Indirect Light
Stressed plants are vulnerable to sunburn. Move the affected plant to a spot with bright indirect light while it recovers. Direct sun on a plant with damaged roots will increase water loss through the leaves faster than the compromised roots can replace it.
Step 7: Resume Fertilizing at Half Strength After 4-6 Weeks
When the plant starts pushing new, healthy growth (not twisted or stunted), you can begin feeding again — but at half the label’s recommended strength. Most gardeners over-fertilize because they follow the package instructions, which are calibrated for ideal greenhouse conditions, not average home growing. If you burned your plant at full strength, half strength is the new maximum. You can learn more about proper liquid fertilizer application techniques to prevent this from happening again.
Organic vs Synthetic Fertilizer: Which Causes Burn Faster?
Synthetic fertilizers cause burn 3-4 times faster than organic alternatives. A heavy dose of synthetic 20-20-20 can push salt levels past the toxicity threshold within hours. The nitrogen is in a form that’s immediately available to roots, and if the plant can’t absorb it all at once, the excess sits in the soil as dissolved salts. Check our breakdown of synthetic fertilizer effects on plants for the full picture on how these concentrated formulas interact with soil biology.
Organic fertilizers — compost, worm castings, fish emulsion, bone meal — release nutrients slowly through microbial activity. This natural buffering means salt concentrations rise gradually over weeks rather than spiking in a single day. A plant can usually absorb organic nutrients as they become available, so less accumulates in the soil.
But organic doesn’t mean burn-proof. Piling 3 inches of compost on top of a small potted plant will still cause problems. Fish emulsion applied at double strength will still burn leaves. The margin of error is just wider with organics — you have days to notice and correct the problem instead of hours.
How Much Fertilizer Is Actually Enough (By Plant Type)
The number one reason gardeners over-fertilize is following package instructions without adjusting for their specific growing conditions. Here are realistic feeding rates that keep plants healthy without pushing them to the edge.
Indoor foliage plants (pothos, philodendrons, monsteras, snake plants): Use half the label’s recommended strength, applied every 4-6 weeks during the growing season (spring through early fall). Stop entirely in winter when growth slows down. These plants evolved in shaded forest floors where nutrients are scarce — they don’t need heavy feeding.
Flowering houseplants (African violets, anthuriums, orchids): Half to full strength every 2-4 weeks during active blooming periods. Switch to a bloom-specific formula (higher phosphorus) when flower buds start forming. Back off to quarter strength during rest periods between bloom cycles.
Outdoor vegetables (tomatoes, peppers, leafy greens): Full strength every 2-3 weeks once the plants are established and actively growing. Heavy feeders like tomatoes and corn can handle this rate easily in garden beds. Light feeders like lettuce and radishes need less — half strength every 3-4 weeks is plenty.
Succulents and cacti: Quarter strength, 2-3 times per year maximum. Once in early spring and once in midsummer is usually enough. Use a low-nitrogen formula — these plants store water in their tissues and grow slowly, so they need far less than tropical foliage plants. Understanding the essential nutrients plants need helps you choose the right ratio instead of defaulting to a generic all-purpose blend.
Seedlings: No fertilizer at all until the first set of true leaves appears (the second set of leaves after the initial seed leaves). After that, quarter strength once every 2 weeks. A common beginner mistake is adding fertilizer to the seed-starting mix — those nutrients just sit unused and concentrate as the soil dries between waterings.
Preventing Over Fertilization: Rules That Actually Work
The best cure for fertilizer burn is never causing it in the first place. These rules will keep you on the safe side with any plant, in any season.
Rule 1: Half strength is the new full strength. Cut every label recommendation in half. The numbers on fertilizer packages are calibrated for commercial growers with ideal conditions — professional greenhouses with controlled temperature, humidity, and light. Your home environment is nothing like that. Half strength still gives your plants plenty of nutrition with a much wider safety margin. Using organic fertilizer for your garden adds another layer of safety because the slow-release nature prevents sudden salt spikes.
Rule 2: Feed by observation, not by calendar. If your plant is growing well with dark green leaves and no signs of deficiency, skip a feeding cycle. Fertilizer is food, not medicine — healthy plants don’t need a scheduled dose. Watch for the signs: pale new growth, slower than expected growth, or lower leaves yellowing evenly (not just at the tips) are genuine hunger signals worth responding to.
Rule 3: Always water before you feed.
Moist soil distributes fertilizer evenly and dilutes it as it moves through the root zone. Applying fertilizer to dry soil creates concentrated pockets of salt right where the roots are, which causes localized burn. Water the plant thoroughly, wait 30 minutes, then apply diluted fertilizer.
Rule 4: Flush the soil once a month. Even if you’re feeding at conservative rates, salts accumulate over time from fertilizer, tap water minerals, and organic matter breakdown. Running extra water through the pot once a month prevents buildup and keeps the soil environment healthy. It takes 5 minutes and saves you from the 4-6 week recovery period of a full burn event.
Rule 5: Stop feeding in winter. Most houseplants enter a semi-dormant state during the shorter, cooler days of winter. Their nutrient requirements drop to nearly zero. Fertilizer applied in winter just sits in the soil and concentrates as water evaporates from the surface — a slow-motion fertilizer burn. Resume feeding in early spring when you see new growth starting.
How to Recognize and Fix Signs of Over Fertilization in Your Plants
Catching fertilizer burn early is the difference between a plant that bounces back in a few weeks and one that ends up in the compost bin. Watch for the pattern — crispy leaf edges, white soil crust, and wilting in damp soil — and act fast by flushing with plenty of water and removing the damaged growth. Most plants are remarkably forgiving once you remove the excess salt and give them time to recover their root function.
The real secret is prevention: feed at half strength, observe your plants before reaching for the fertilizer bottle, and remember that less is almost always more when it comes to plant nutrition. A slightly underfed plant grows a bit slower. An over-fertilized plant dies. The math is simple.
From PDF to Excel in one click
Forget retyping line by line. Upload any bank statement, get a spreadsheet you can actually use. Your files are never stored, and you can test the converter with 3 free conversions.
Try it free