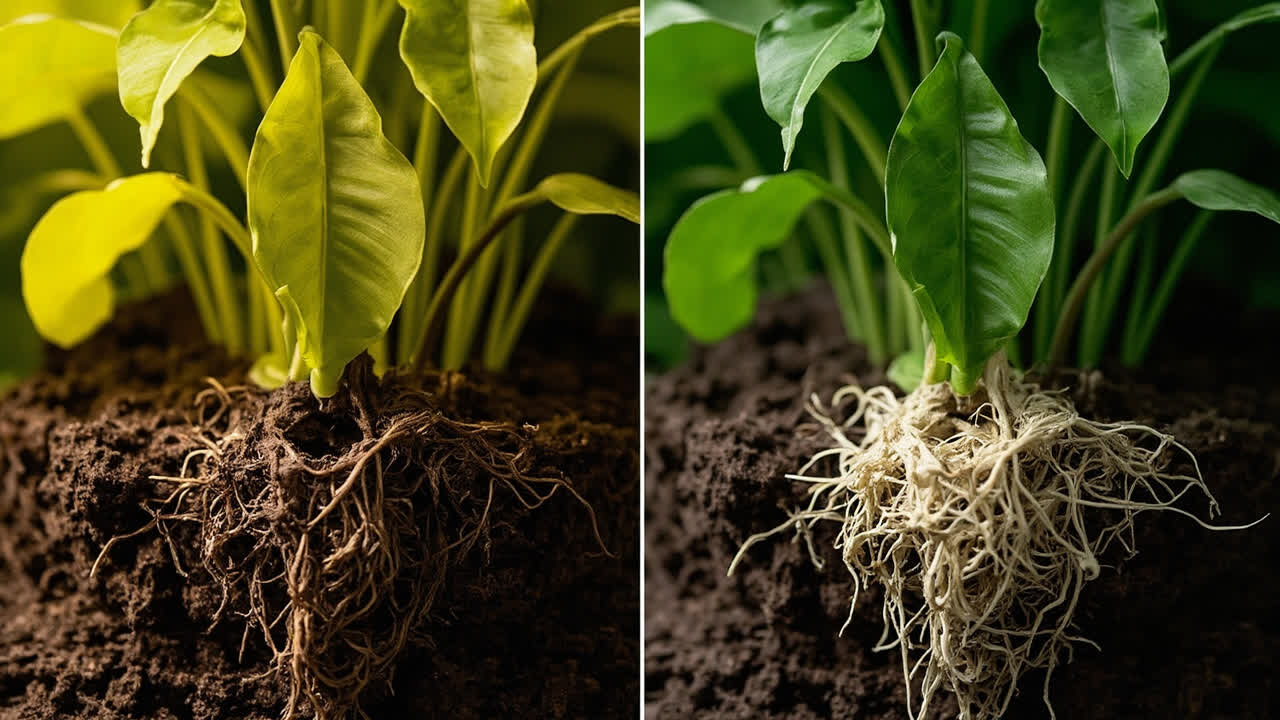
You’ve propagated pothos before. You took a cutting, put it in a glass of water on the windowsill, watched roots grow like crazy, potted it in soil, and then watched the whole thing slowly die over the next four to six weeks. The roots looked healthy. The leaves looked fine when you potted it. And then it just collapsed. This is the pothos propagation pattern that goes wrong most often, and it’s not about the cutting — it’s about the transition from water roots to soil roots.
Water roots and soil roots are not the same thing. Pothos is famous for rooting easily in water — but a cutting that roots in water hasn’t successfully propagated until it establishes a soil root system. Most failures happen in the weeks after potting, not during the weeks of rooting. This guide covers the complete process so you know what to do at each stage.
Why Pothos Is One of the Easiest Plants to Propagate
Despite the transition issue, pothos is one of the most forgiving plants to propagate. This is because pothos vines have nodes that contain pre-formed root initials — the cells that will become roots are already present at each node, waiting for the right signal (contact with water or moist soil) to activate. You don’t need rooting hormone, you don’t need perfect conditions, and you don’t need to be particularly careful with the cutting itself.
The trade-off is that this forgiveness makes people careless with the transition. Because the cutting rooted so easily in water and looked so vigorous, it’s easy to assume it will establish just as easily in soil. It won’t — not without the specific transition steps covered below. But once you know the pattern, pothos propagation is genuinely foolproof.
Choosing the Right Part of the Vine to Cut
Look at your pothos vine. Each leaf attaches to the stem at a node — a slightly swollen joint where the petiole meets the main vine. That’s also where the aerial root is located if your plant has been growing in high humidity. You want to cut at least 1 inch below a node, because the root system will emerge from the node, not from the stem tissue between nodes.
A good pothos cutting has two or three nodes and two or three leaves. Each node can produce roots, so more nodes means more root-forming potential. A single-node cutting with one leaf will work but establishes more slowly. If you’re cutting a long trailing vine, you can cut it into sections of two or three nodes each — this is an efficient way to propagate multiple plants from one good vine.
Never cut in the middle of a bare section of vine with no node — the bare section has no pre-formed root initials and the cutting will just sit there without rooting. Always include a node.
The Rooting Process Step by Step
Step 1: Make the Cut
Use clean scissors or a blade. Disinfect with rubbing alcohol if you’ve been working with other plants. Cut 1 inch below the lowest node you want to include. Make a flat horizontal cut — the flat cut surface gives the maximum area for root emergence at the node site.
Remove the leaf closest to the cut end — that leaf will be below the water line and would rot if left on. Leave the other leaves intact. If the remaining leaves are large (more than 4 inches across), cut each one in half across the width — this reduces the leaf surface area that loses water through transpiration before roots are formed to replace that moisture.
Step 2: Set Up Water Rooting
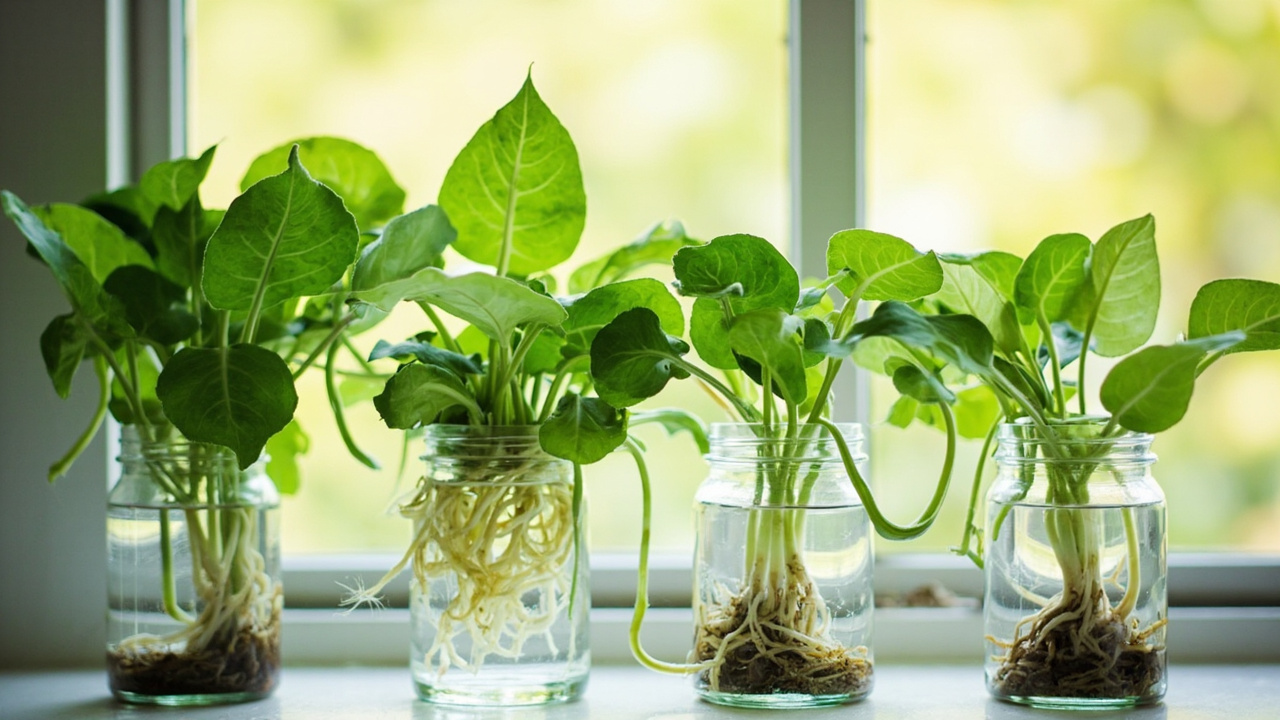
Fill a clear glass container — any jar, drinking glass, or small vase works. Use room-temperature tap water. Place the cutting so the node sits below the water line but the leaves stay dry. Change the water every 3–4 days regardless of appearance. Cloudy water won’t hurt the cutting but stale water slows root development.
Place in bright indirect light. Direct sun will heat the water and can cook the developing root initials. A windowsill with filtered light is ideal. In low light, rooting will be slower but still works — expect four to six weeks instead of two to three in lower light conditions.
Step 3: Watch for Root Development
Within one to two weeks in spring or summer, you should see small white nubs forming at the node — these are root initials. Within another one to two weeks, those nubs will extend into visible roots 1–2 inches long. Once those roots are at least 1.5 inches long with multiple roots visible, you can move to soil. Don’t wait until the roots are very long (4+ inches) — longer roots get tangled and damaged more easily during transplanting.
What happens next is important: the transition to soil is when most pothos cuttings fail, not the rooting phase. Do not skip the transition steps below.
The Transition to Soil: This Is Where Most Cuttings Fail
Most pothos propagation failures happen during the transition from water roots to soil roots, not during rooting itself. Water roots and soil roots are anatomically different. How you handle this transition determines whether the cutting survives the first month in soil.
Why Water Roots Struggle in Dry Soil
Water roots are fine, white, and designed to absorb dissolved minerals from water. They are not designed for soil. Soil is a different environment — it has more mechanical resistance, different microbial communities, and a fundamentally different moisture relationship. Water roots that go directly into dry soil often can’t make the adjustment and the cutting collapses not because it couldn’t root, but because it couldn’t adapt.
There are two approaches to handling this. Both can work — choose based on how much time you have and how many cuttings you’re managing.
Direct Soil Propagation (More Reliable for Established Plants)
The most reliable long-term approach is to root the cutting directly in damp soil from the start. Use a small pot — 3 to 4 inches wide — filled with a well-draining potting mix. Insert the node below the soil surface, firm the soil gently around the stem, and keep the soil consistently moist (not wet) until roots establish.
Cover the pot with a clear plastic bag loosely tented over the top to maintain humidity around the cutting. This is critical for the first two to three weeks — without humidity management, the cutting will lose moisture through its leaves faster than the non-existent roots can replace it. Remove the bag for 10 minutes once a day to allow air circulation and prevent fungal growth.
This method takes longer to show visible roots (you can’t see into the soil) but produces plants that are already adapted to soil from day one and don’t need any transition period. The trade-off is the waiting and the uncertainty — you’re trusting the process without visual confirmation.
Gradual Transition Method (For Water-Rooted Cuttings)
If you’ve already rooted your cutting in water and it has 1.5+ inches of roots, use this gradual method. Fill a small pot with dampened soil mix and place the rooted cutting in it without watering immediately. Leave it in its bright indirect light spot. After five days, give it a light watering. After another five days, begin watering normally — only when the top 1 inch of soil is dry.
Keep the cutting in the same humidity tent described above for the first month, even after it’s in soil. The combination of high humidity and careful (reduced) watering gives the water roots time to develop true soil roots — tiny white branching structures that look different from the water roots and are specialized for soil conditions.
During this period, expect the cutting to look slightly wilted or less turgid than it was in water. This is normal moisture stress. If the whole cutting goes limp and the stem softens, that’s a sign of overwatering — reduce watering immediately and check the drainage.
Aftercare for Your New Pothos Plant
Once your pothos cutting shows new growth, it is easy to assume it is fully established and treat it like a normal plant. It is not — not yet. The first two months after establishment are when the root system is still developing. A few specific warning signs tell you whether it is genuinely established or still in the vulnerable transition phase.
First Signs of Successful Establishment
You’ll know the cutting has made it through the transition when you see new growth pushing from the apex — a new leaf, a new vine tip, anything that shows the plant is now generating new top growth rather than just surviving. Until you see new growth, the plant is still in the establishment phase.
Once established, pothos are among the easiest houseplants to maintain. Bright indirect light, water when the top 1–2 inches of soil are dry, and monthly feeding during the growing season is all they need. If you’re in a low light space, pothos tolerates lower light better than most houseplants and will just grow more slowly.
Do not fertilize for the first two months after the cutting has established in soil. The fresh soil mix contains enough nutrients for initial growth, and adding fertilizer during establishment can burn the newly developed root hairs before they can process the salts.
Common Problems and How to Fix Them
If the cutting rooted in water but the leaves yellow and the stem softens within weeks of potting, that’s the water-to-soil transition failure. The roots were healthy in water but couldn’t adapt to soil conditions. Your options: try a new cutting using direct soil propagation, or take a fresh cutting from the collapsing plant and try again with the direct soil method this time.
If the cutting isn’t rooting at all after four weeks in water, check that the node is submerged. If you cut too high and the node is above the water line, it cannot root. Reposition the cutting so at least one node sits below the water surface. Also check the temperature — pothos roots best between 65–80°F (18–27°C). Cooler rooms slow rooting significantly.
For more on general pothos care, see our pothos temperature guide. And for pruning and training your established pothos, our pothos pruning guide explains how to cut back vines without damaging the plant.
From PDF to Excel in one click
Forget retyping line by line. Upload any bank statement, get a spreadsheet you can actually use. Your files are never stored, and you can test the converter with 3 free conversions.
Try it free