A ZZ plant needs repotting only every two to three years, in spring or early summer, into a pot that is only one to two inches (2.5 to 5 cm) larger in diameter than the current pot. The plant stores water in thick rhizomes, prefers a tight root mass, and resents excess moisture around the rhizome. Repotting into a pot that is too large is the most common cause of post-repot rot, and a ZZ that has been moved into the right size pot at the right time barely shows any transplant stress at all.
The signals that a ZZ is ready for a new pot are specific and worth learning. The first is rhizomes pressing against the inside of the pot wall, visible if you gently tip the plant out. The second is water running straight through the pot and out the drainage hole within seconds, which means the medium has been displaced by root and rhizome mass. The third is the plant becoming top-heavy and tipping under its own weight, which means the root mass has outgrown the support the pot can provide. The fourth is roots circling the drainage hole or growing out of it. A ZZ that is not showing any of these signals does not need repotting just because three years have passed.
This page covers when a ZZ actually needs repotting, how to pick the right pot size and material, the step-by-step procedure, how to handle a tight rhizome cluster, the four-week aftercare plan, and the four recurring failure modes. For the broader care picture, the care guide covers watering rhythm, light, and soil in parallel.
When a ZZ Plant Actually Needs Repotting
A healthy ZZ in a stable environment does not need annual repotting. The plant grows slowly, holds a tight root mass, and stays healthy in the same pot for two to three years without any intervention. The exception is when one of four signals shows up. The first signal is rhizomes pressing against the inside of the pot wall, visible when you tip the plant out: the rhizome mass has reached the edge of the container and is starting to push outward. The second is water moving through the pot too fast, with most of the volume coming out of the drainage hole within five seconds of pouring. That means the medium has been pushed aside by roots and rhizome, and the pot is functionally full of plant material.
The third signal is top-heaviness. A mature ZZ with multiple tall stems can become unstable in a small or shallow pot, and the plant starts to lean or tip under its own weight, especially in a draft. The fourth signal is roots or rhizomes growing out of the drainage hole. None of these signals require an emergency repot, but they do mean the next repotting window is approaching. The best time to repot a ZZ is spring or early summer, when the plant is starting its active growth phase and can recover from the move quickly. For the soil refresh that goes with the new pot, the soil requirements page covers the medium to use.
Choosing the Right Pot Size and Material
The right new pot is one to two inches (2.5 to 5 cm) larger in diameter than the current pot. That is a small increment on purpose. A ZZ recovers from repotting by sending new roots into fresh medium, and a small jump in pot size means the plant fills the new space within a single growing season. A larger jump means the new medium sits unused for months, and the lower half of the pot stays wet long after the upper half has dried. The plant does not need the space, and the extra medium is a rot risk.
Pot material changes how fast the medium dries. Terracotta is the most forgiving choice for most homes because the clay walls wick moisture out of the medium, which gives a wider margin between watered and over-watered. Glazed ceramic and plastic pots hold moisture longer, which is fine in a bright, warm room with strong airflow, but a real risk in a low-light corner. The honest trade-off is that a plastic pot is lighter and cheaper, but it requires more careful watering, especially in the first four weeks after repotting when the plant is still filling the new pot. For a fuller picture of the light conditions that determine how fast the medium dries, the light requirements page covers the ranges.
The Step-by-Step Repotting Procedure
- Water the plant the day before. Moist soil and a hydrated plant make it easier to remove the root mass intact and reduce transplant shock. Do not water again until the new medium has dried to the same level as the old.
- Lay out materials before you start: the new pot with a drainage hole, fresh chunky soil mix, a trowel, scissors or pruners, and a surface you do not mind getting dirty. If the new pot is terracotta and unglazed, soak it in water for ten minutes to saturate the clay; otherwise the dry pot will pull moisture out of the medium faster than the roots can use it.
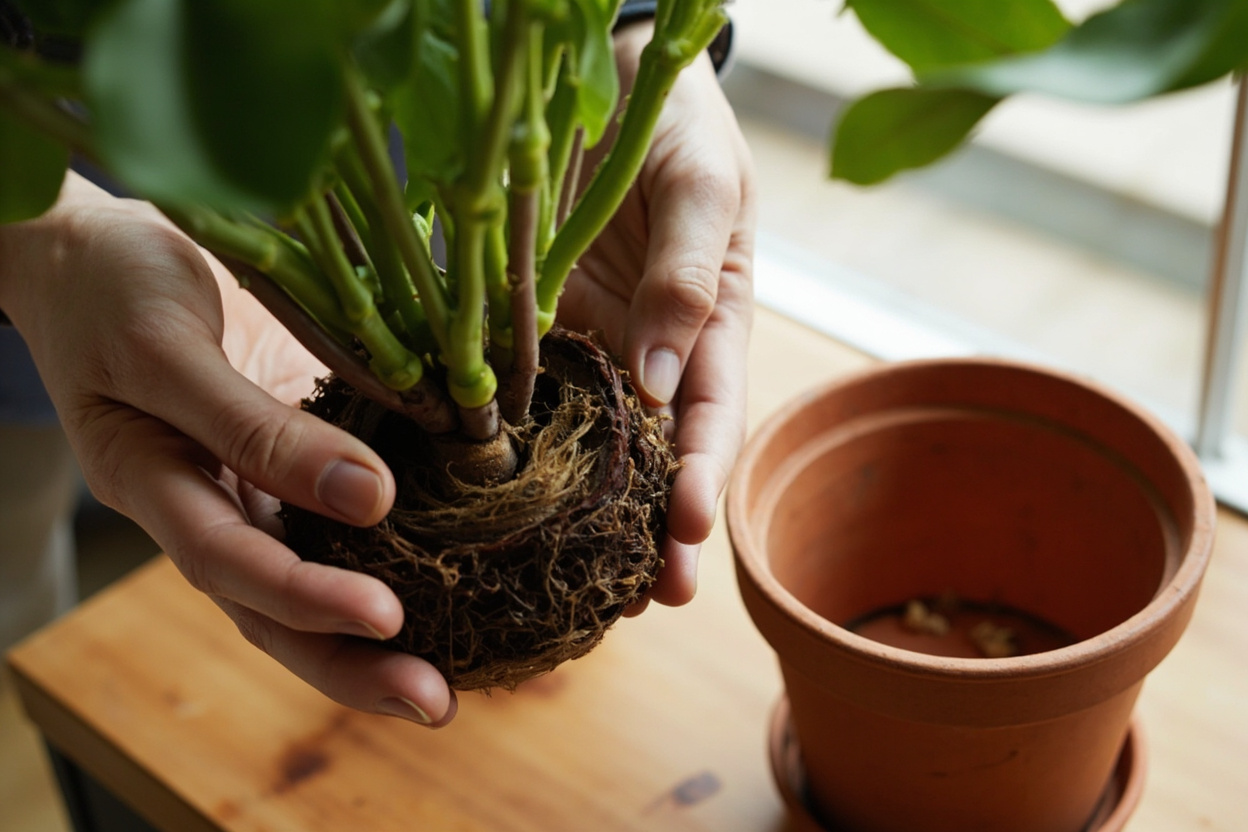
- Remove the plant from the old pot. Turn the pot on its side, support the stems with one hand, and press or tap the sides of the pot to loosen the root mass. If the pot is plastic, squeeze the sides gently. If the plant is firmly stuck, run a long knife around the inside edge rather than yanking the stems.
- Tease out circling roots. The root mass will hold the shape of the old pot. Use your fingers to loosen the outer roots, especially any that were circling the bottom. Do not aggressively wash the old medium off; remove only what falls away easily.
- Position the plant in the new pot at the same depth it was growing. Add a layer of fresh medium to the bottom of the new pot, set the plant on top, and adjust the depth by adding or removing medium underneath. The top of the rhizome should sit just below the surface, no deeper than it was in the old pot.
- Backfill around the root mass with fresh medium. Tap the pot on the table to settle the medium into the air pockets, then top up if the level drops. Do not press the medium down with your fingers; a chunky mix compacts under pressure and loses the air pockets the rhizome needs.
- Water lightly. The goal is to settle the medium around the roots, not to soak the new pot. Pour a small amount of water around the perimeter of the pot, enough to wet the top inch (2.5 cm), and let it drain. Do not water again until the top two inches (5 cm) of the new medium are dry, which usually takes seven to ten days for a ZZ in a normal indoor environment.
Handling a Heavy or Tightly Packed Rhizome Cluster
A ZZ that has been in the same pot for three or more years often comes out as a tight cluster of rhizomes with very little loose medium. This is normal and not a problem on its own. The decision to break the cluster apart should be deliberate. The reason to divide is to make a new plant, in which case the cluster is cut into two or three sections with a clean knife, each section carrying at least two to three healthy stems and a healthy rhizome piece. The reason to leave it alone is to keep the plant as a single specimen, in which case the cluster goes into the new pot intact and the fresh medium fills the gaps around it.
Do not break the cluster into smaller pieces than that, even if it looks crowded. Small rhizome pieces take a long time to recover and may not push new growth for a full growing season. The warning sign that the cluster is too tight to handle gently is a rhizome that has grown into the drainage hole of the old pot; in that case, cut the pot rather than pulling the rhizome through. For the watering rhythm that follows the move, the watering guide covers the timing during the four-week settling period.
Aftercare: The First 4 Weeks
The first four weeks after repotting set the tone for the plant’s recovery. The medium should be allowed to dry to the same level it would in a normal pot before the move: the top two inches (5 cm) dry, with moisture still present in the lower half. Watering on the same schedule as a mature, established ZZ usually works, which is roughly every 10-14 days in a typical home. The plant should be held out of direct sun for the first week; bright indirect light is fine, but a hot window can scorch a plant whose roots are not yet anchored in the new medium.
Hold off on fertilizer for the full four weeks. The fresh medium has a small amount of nutrient value, and the plant’s energy should go into root recovery rather than into pushing new leaf growth. Transplant droop, where one or two of the oldest stems lean slightly, is normal in the first two weeks and usually resolves on its own. The plant is most likely ready to resume its normal care rhythm when a new stem emerges from the rhizome, which usually happens in the second or third week in spring. For the feeding plan to resume at that point, the fertilizer schedule page covers the dilution and timing.
Repotting Failure Modes to Avoid
Four recurring mistakes show up in most failed ZZ repottings. The first is over-potting, where the new pot is two or more inches larger in diameter than the old one. The plant does not use the extra medium, and the lower half of the pot stays wet for weeks. The second is watering too heavily right after the move, which saturates the new medium before the roots have anchored and often leads to a soft patch on the rhizome. The third is breaking rhizomes, which happens when the reader tries to pull the root mass apart by force rather than teasing it gently or cutting it cleanly.
The fourth and most common is using a peat-heavy or compacted mix in the new pot. The plant had been surviving in the old mix; replacing it with a denser medium reverses any progress on soil structure. The fix in all four cases is recovery: pull the plant out, remove the soft rhizome tissue, refresh the medium to a chunky blend, and repot into a smaller pot than the one that caused the issue. For the full recovery procedure, the root rot page walks through the steps.