Root rot is one of the most common causes of houseplant death, and the frustrating part is that by the time you see the symptoms on the leaves, the root damage below the soil has already been happening for weeks. Understanding what root rot is, why it happens, and how to catch it early is the single most valuable plant health skill you can develop — because once you understand root rot, you understand why most houseplant care advice works.
What Root Rot Actually Is
Root rot is not a single disease. It is a condition — a set of symptoms — caused by one or more factors that damage the root tissue and allow opportunistic pathogens to colonise and spread. The primary culprits in most houseplant situations are fungi in the genera Pythium, Phytophthora, and Fusarium. These organisms are present in virtually all soil at low levels. They become a problem when the conditions allow them to multiply and invade root tissue.
The common factor in almost every case of root rot is oxygen-deprived soil. When soil stays saturated — when the air pores between soil particles fill with water instead of air — the roots cannot breathe. Root cells begin to die within 24 to 48 hours of saturated conditions. Dead root tissue is exactly what the opportunistic fungi need as a food source. They colonise the dead tissue, and the infection spreads from dead roots to healthy ones.
Once the root system’s functional capacity drops below a threshold — typically when more than a third to half of the root mass is compromised — the plant can no longer draw enough water and nutrients to maintain its leaves. The symptoms you see from above — yellowing, wilting, brown tips — are the visible result of a root system that has already been significantly damaged.
What Causes Root Rot in Houseplants
Overwatering. The most common cause. Giving a plant more water than it can use, more frequently than the soil can dry out, creates the saturated conditions that suffocate roots. Even a single instance of overwatering followed by several days of saturated soil can cause measurable root damage — especially if the pot has poor drainage or the soil mix is heavy and moisture-retentive.
Poor drainage. A pot with no drainage hole, or a drainage hole that is clogged or blocked, means excess water has nowhere to escape. The water that does not evaporate stays in the pot, keeping the root zone perpetually wet. Even careful watering cannot fully compensate for a pot that does not drain.
Soil mix that holds too much moisture. Dense potting soil, clay-heavy mixes, or soil that has compacted over time retains water far longer than most houseplants can tolerate. The roots sit in moisture for days after watering, and the slow drying accelerates anaerobic conditions.
Cool temperatures combined with wet soil. Warm soil dries faster. Cool soil stays wet longer. If a houseplant is kept in a cool room — below 18°C — and watered on the same schedule as a plant in a warm room, the cool-soil plant will develop root rot while the warm-soil plant does not. This is a common mistake in winter months or in air-conditioned spaces.
Reusing contaminated soil. If a plant has died from root rot, the soil it was growing in may contain the fungal pathogens that caused it. Reusing that soil in another pot spreads the problem to healthy plants. Always use fresh soil when repotting after root rot.
How to Tell If Your Plant Has Root Rot
The early signs are subtle — and that is why root rot is so often caught too late. Here is what to look for, in order of how early the signs typically appear:
First signs: The plant stops growing. It is not producing new leaves or extending existing ones. This happens before any visible symptoms on the leaves. If your plant has been healthy and suddenly goes into a prolonged pause — more than a few weeks in the growing season — check the soil.
Early warning signs on leaves: Older leaves yellowing at the base of the plant — not the newest growth at the tips. The yellowing is soft and diffuse rather than the sharp, crisp dry patches of a nutrient problem. The leaves may also look duller than usual, less vibrant, as the root system struggles to supply the full volume of foliage with reduced capacity.
Confirmed signs: The soil stays wet for more than a week after watering. There is a sour, musty smell from the pot when you put your nose near the soil surface. The stem at the base feels soft or gives slightly when pressed. The lower leaves yellow and then go limp rather than simply aging and dropping cleanly.
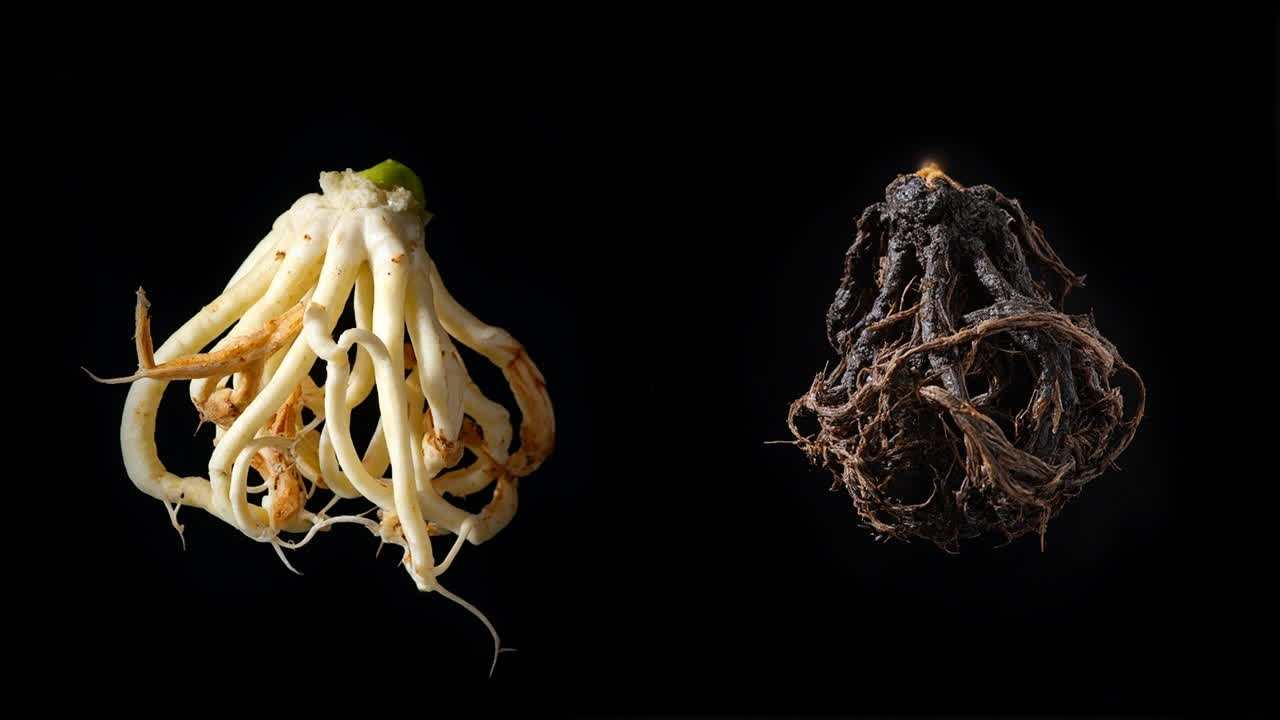
Definitive diagnosis: Remove the plant from the pot and examine the roots directly. Healthy roots of most houseplants are firm, light-coloured — white, cream, tan, or pale brown — and slightly elastic when pulled. Rotting roots are dark brown to black, mushy, slimy, and break apart easily. They smell foul. If the roots look like this, the diagnosis is confirmed.
How to Save a Plant With Root Rot
Recovery depends on how far the rot has spread. Here is the step-by-step process:
Step 1 — Remove the plant from its pot. Tip the pot and slide the root ball out carefully. Do not pull by the stem — support the base.
Step 2 — Examine and trim the roots. Using clean secateurs or scissors, remove all dark, mushy, foul-smelling roots. Cut back to firm, light-coloured tissue. If the entire root ball is compromised — more than two-thirds of roots are gone — the plant is in critical condition and recovery is unlikely but still worth attempting.
Step 3 — Rinse the root ball. Rinse the remaining root system under running water to remove soil that may carry fungal spores. If the root ball was severely infected, the old soil is contaminated and must be discarded.
Step 4 — Treat with fungicide. Drench the remaining roots with a copper-based or broad-spectrum houseplant fungicide diluted as directed. This reduces the probability of re-infection as the plant recovers.
Step 5 — Repot in fresh, fast-draining soil. Use a clean pot with at least one large drainage hole. Use fresh potting mix — never reuse the contaminated soil. The new soil should be well-draining: add perlite, coarse sand, or orchid bark to improve drainage if needed.
Step 6 — Place in bright indirect light. A recovering plant needs light to generate the energy for root regeneration. Do not place in direct sun — that adds stress.
Step 7 — Do not water for at least two weeks. The plant has reduced root mass and therefore reduced water demand. Watering too soon after treatment is the most common reason for failure. Check the soil at the two-week mark and water only when the top 3 to 5 cm is dry.
Recovery signs — new leaf growth, firm stems, no new yellowing — typically appear within four to six weeks if the treatment was successful.
How to Prevent Root Rot in Any Houseplant
Root rot prevention follows a small number of consistent rules:
- Water only when the soil is dry to the touch — not on a fixed schedule
- Use pots with drainage holes and empty saucers 30 minutes after watering
- Use well-draining soil mixes that allow rapid drying after watering
- Reduce watering frequency in winter or in cool rooms
- Never reuse soil from a plant that died from root rot
- Clean pots with a 10% bleach solution before reusing them
These rules apply to virtually every houseplant. The specifics of frequency and soil composition vary by plant species, but the principle is always the same: roots need air as much as they need water, and saturated soil removes the air.
For specific application to drought-tolerant plants like Dracaena, see the Mass Cane Plant root rot guide. For plants that prefer more moisture, see the watering schedule guide and the soil guide for your specific plant type.
From PDF to Excel in one click
Forget retyping line by line. Upload any bank statement, get a spreadsheet you can actually use. Your files are never stored, and you can test the converter with 3 free conversions.
Try it free