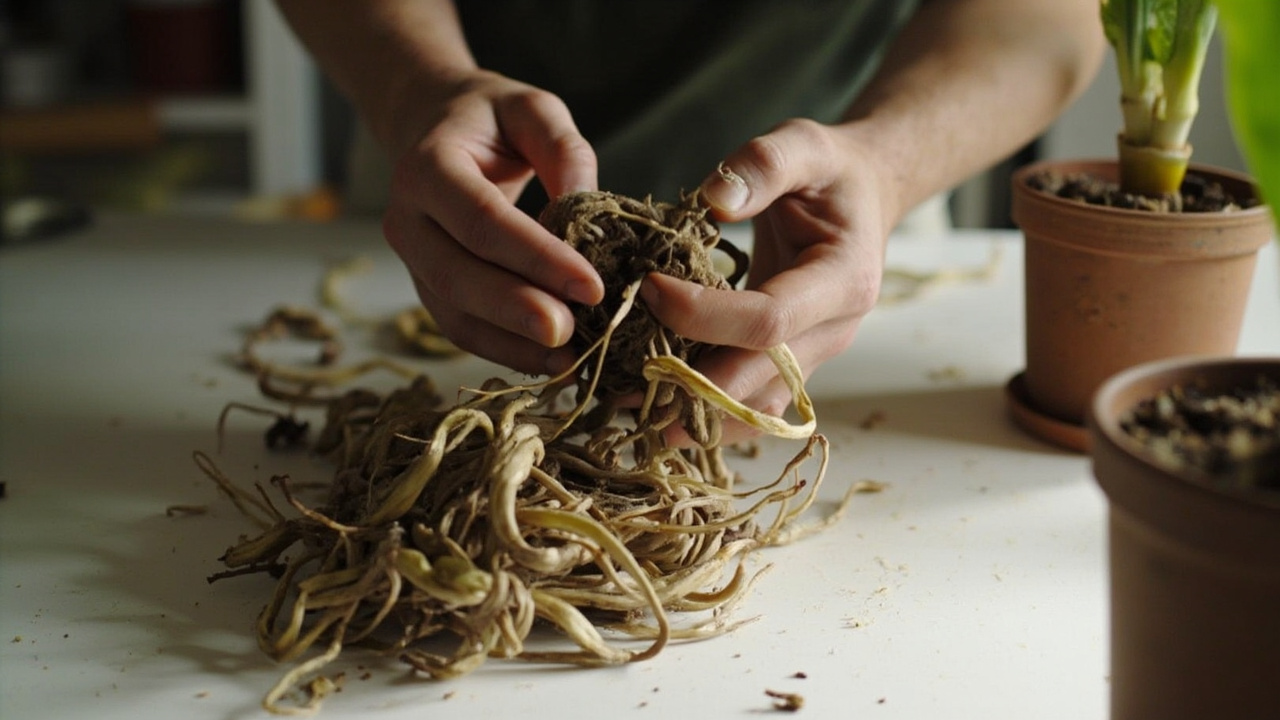

Propagating Bird of Paradise through offset division is the most reliable method for creating new plants, and it aligns with the species’ natural growth habit. Strelitzia reginae produces offsets slowly from the base of the main crown, and each offset that reaches sufficient size can be divided and potted independently. The process requires patience more than skill. The plant heals quickly when given the right conditions, and the success rate for properly executed divisions is high.
The single most important decision is timing. Division should occur during the active growing season, when the plant has maximum metabolic capacity to recover and establish new roots. For indoor Strelitzia, this means late spring to early summer, when temperatures are consistently above 18°C (65°F) and light levels are increasing. Dividing during dormancy or active bloom will significantly reduce survival rates.
The second critical factor is offset size. Only offsets with their own developed root system and at least three to five mature leaves should be divided. Smaller offsets lack the energy reserves to survive separation and will almost certainly fail, regardless of how carefully the division is performed. This restraint, waiting for the right size, is what separates successful propagation from frustrated attempts.
When to Divide Your Bird of Paradise
The optimal window for dividing Bird of Paradise is late spring to early summer, when the plant has exited dormancy and entered its most vigorous growth phase. This timing ensures that both the mother plant and the division have maximum metabolic capacity for root regeneration and leaf production during the recovery period.
Signs that your Strelitzia is ready to divide:
The mother plant has outgrown its container, with roots emerging from drainage holes or the soil drying out unusually fast after watering. This indicates that the root ball is densely packed, likely with offsets competing for space and resources. The plant produces new offsets at the base that are visible as separate crowns pushing against the soil surface or the pot wall.
Specifically, look for offsets that have developed their own root system. Gently remove the plant from its pot and inspect the root ball. Viable offsets will have roots extending from their base, independent of the mother plant’s root mass. An offset with three or more mature leaves and a root system spanning at least 2 to 3 inches is ready for division. Smaller offsets should remain attached and allowed to grow for another growing season.
The mother plant’s overall health matters as well. Only divide a plant that is actively growing and free from pest damage or disease. A stressed or declining mother plant will not recover well from division, and the operation could push it past the point of recovery. If your Strelitzia shows signs of root rot, severe pest infestation, or chronic underwatering, address those issues first before attempting propagation.
Preparing for Division: Tools and Setup
Proper tool preparation minimizes infection risk and physical damage during division. The key principle is clean, sharp cutting surfaces that make smooth incisions rather than tearing tissue.
Required tools
A sharp, clean knife or pruning shears. Sterilize with rubbing alcohol before use. A large, sturdy container or work surface for extracting and examining the root ball. Fresh, well-draining potting mix formulated for Strelitzia (standard potting mix amended with 30% perlite). Pots that are only 1 to 2 inches larger in diameter than the offset’s root ball. Oversized pots retain excess moisture and increase rot risk. Horticultural charcoal or crushed charcoal pieces for the pot bottom to improve drainage. Clean gravel or broken pottery shards for the drainage layer.
Pre-division preparation
Stop fertilising the mother plant two weeks before division to reduce metabolic activity and stress. Water the plant thoroughly the day before division so the root ball is moist but not waterlogged. Dry root balls shatter during extraction, while waterlogged ones promote bacterial entry through fresh cuts. Have all potting materials assembled and within reach before removing the plant from its container, as the division process should proceed without interruption once started.
Removing the Plant and Assessing the Root Ball
Extracting the plant from its container requires care to avoid breaking roots or damaging the crown. Turn the pot sideways and gently tap the rim and sides to loosen the root ball. If the plant is root-bound, the root ball may slide out as a solid mass. For stubborn cases, run a knife around the inner perimeter of the pot to separate roots from the container wall.
Once removed, place the root ball on your work surface and examine it carefully. Identify each offset by tracing its leaves down to where it connects to the main crown. Note which offsets have independent root systems extending outward from the central mass, and which are still fused to the mother plant’s roots. This assessment determines which offsets are viable for division and which should remain attached.
Gently brush away loose soil from the root ball to expose the connection points between offsets and the mother plant. Do not pull or force separation at this stage. The goal is visualization only. The actual division happens in the next step, after you have mapped the root architecture and confirmed which offsets are ready.
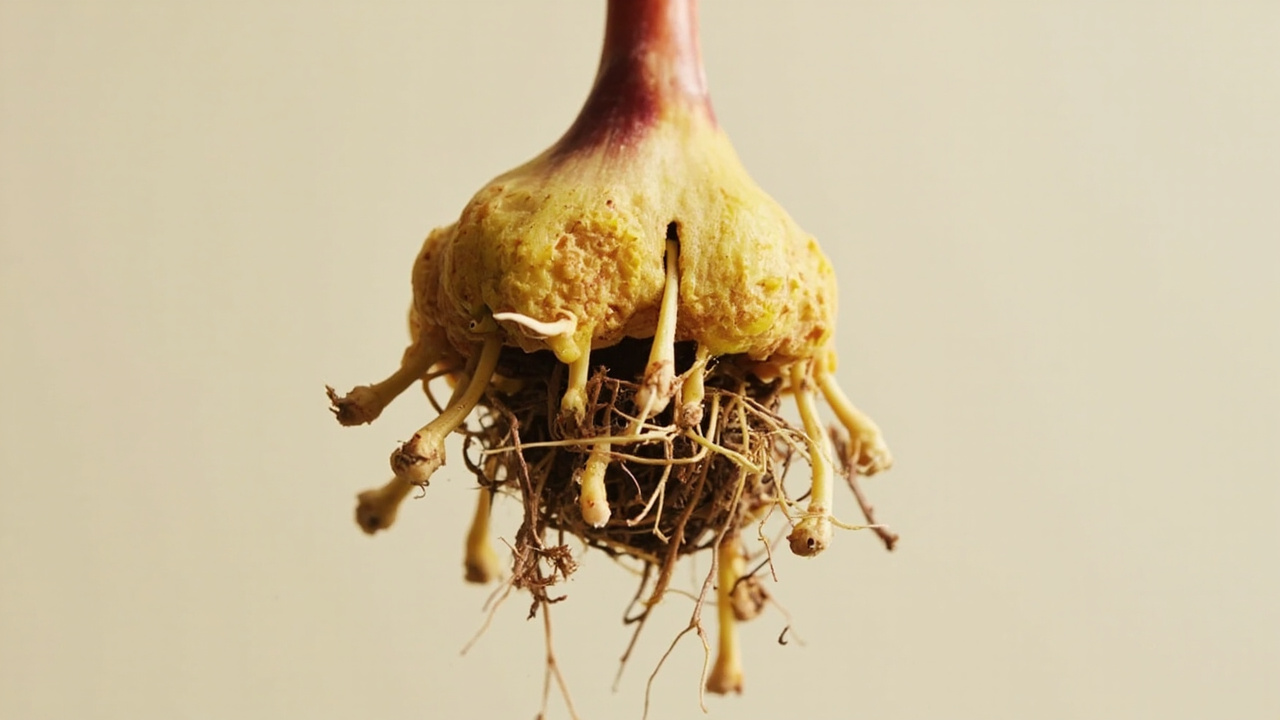
Separating Offsets from the Mother Plant
The division itself requires a firm grip, a sharp tool, and confidence. Hesitation leads to torn tissue and irregular wounds that heal poorly. Use your clean knife or pruning shears to make a single, decisive cut through the connection point between offset and mother plant.
Locate the natural seam where the offset’s root system begins to diverge from the mother plant’s roots. Position your blade at this junction and cut cleanly through. For larger offsets with substantial root mass, you may need to gently tease apart some of the fused roots with your fingers before cutting, but do not force separation. If the connection resists, the offset may not be ready, and you should return it to the mother plant and try again in six to twelve months.
Each division should retain as much of its own root system as possible. The minimum viable division has three to five mature leaves and a root ball spanning at least 2 inches in diameter. Smaller divisions have been shown to fail at high rates in controlled trials, so err on the side of leaving marginal offsets attached longer rather than risking their loss.
After separation, inspect each division’s cut surface. Healthy root tissue is pale cream to white and firm. Brown, mushy, or foul-smelling tissue indicates rot that must be trimmed away before potting. Use a clean, sharp blade to remove any damaged tissue, cutting back to healthy tissue only.
Callusing and Preparing Cut Sections
Callusing is the single most important step for preventing rot in newly divided Strelitzia. The fresh wounds created during division are vulnerable to bacterial and fungal entry, and allowing them to dry and form a callus significantly reduces this risk.
The callusing protocol
Place the divided offsets in a warm, dry, shaded location with good air circulation. Do not pot them yet. Allow the cut surfaces to dry and form a brown, corky callus layer. This typically takes 24 to 48 hours for Strelitzia, depending on humidity and airflow. During this period, do not water the divisions or mist the cut surfaces. The goal is desiccation of the wound edge, not drying out the entire plant.
If ambient humidity is high or airflow is poor, you can accelerate callusing by dusting the cut surfaces lightly with horticultural sulfur powder or cinnamon, both of which have antifungal properties. Apply sparingly. A thin dusting is sufficient, and excess powder can irritate the tissue.
Do not attempt to pot divisions before the callus has formed. Placing a fresh wound directly into moist potting medium is the most common cause of post-division rot, and it is entirely preventable with this simple waiting period. The callus acts as a physical barrier that seals the wound from pathogens in the growing medium.
Potting Divisions: Medium, Container, and Initial Care
Once callused, the divisions are ready for potting. The potting medium must drain rapidly while retaining enough moisture to support root emergence. A standard recipe is two parts quality potting mix to one part perlite, with a handful of horticultural charcoal mixed throughout to further improve drainage and inhibit microbial growth.
Pot selection
Choose a container only 1 to 2 inches larger in diameter than the offset’s root ball. A pot that is too large holds excess soil that stays wet longer than the roots can absorb it, creating conditions favorable to rot. Terracotta pots are preferable to plastic for this reason. They wick moisture from the soil walls and promote faster drying, which Strelitzia prefers.
Potting procedure
Add a drainage layer of gravel or broken pottery shards to the pot bottom, approximately 1 inch deep. Add a thin layer of potting mix, then position the division so the crown sits at the same depth it occupied in the mother plant’s root ball, not deeper, not shallower. Fill around the roots with fresh mix, firming gently to eliminate air pockets but not compacting the medium. Water immediately after potting with room-temperature water, allowing it to drain freely through the container. Do not water again until the top 2 inches of soil are dry.
Bird of Paradise Soil and Repotting Guide , for detailed soil recipes and repotting technique that applies to newly divided plants.
Post-Division Care: Recovery and Root Establishment
The first four to eight weeks after division are the critical recovery period. During this time, the division is not growing leaves. It is generating new roots from the callused wound surfaces, drawing on the energy reserves stored in its existing leaves and root system.
Watering
Keep the potting medium barely moist during recovery. Damp to the touch but never wet. Water only when the top inch of soil feels dry, and then water sparingly, just enough to moisten the root zone without saturating the medium. Overwatering during this period is the leading cause of division failure, as the plants’ limited root systems cannot absorb excess moisture and rot sets in quickly.
Humidity management
Maintain moderate humidity (50 to 60%) around the divisions to reduce transpiration stress while new roots establish. A pebble tray beneath the pot or a clear plastic dome placed loosely over the foliage can help, but ensure adequate air circulation to prevent fungal growth. Do not mist the foliage directly. Water droplets on leaves can promote bacterial infection through any remaining micro-wounds.
Light
Place divisions in bright, indirect light. The same conditions the mother plant occupied, but filtered through a sheer curtain if the original position received direct sun. Direct sunlight on a division with no established root system will scorch the leaves and deplete energy reserves faster than the plant can replace them. As new leaves emerge, typically after 4 to 6 weeks, you can gradually increase light exposure.
Fertilising
Do not fertilise during the first 8 to 10 weeks after division. The plant is still establishing roots and has sufficient energy reserves from its pre-division state. Early fertilisation can burn emerging root hairs and delay establishment. Begin light feeding only after you observe consistent new leaf growth, which signals that the root system is functional.
The mother plant should also receive careful attention during this period. Keep it in its normal care routine but monitor closely for any signs of stress, wilting, leaf yellowing, or stunted growth, which may indicate that the division removed too much root mass or that the remaining plant is struggling to compensate. Most healthy Strelitzia recover from division within 2 to 4 weeks and resume normal growth, though the initial leaf produced after division may be smaller than usual.
Bird of Paradise Care Guide , for ongoing care guidance after the division has fully recovered.
Turn That PDF Into a Spreadsheet in Minutes
You've seen how to do it manually — now let the tool handle the heavy lifting. Upload your bank statement and get Excel, CSV, or QBO in a few clicks.