Propagating begonias is one of the most satisfying things you can do as an indoor gardener. These plants root readily from stem and leaf cuttings, and the process doesn’t require any special equipment — just a healthy parent plant, a sharp cutting tool, and a little patience. In return, you get new plants that you can keep, give away, or trade.
The two main methods are stem cuttings and leaf cuttings. Stem cuttings are faster — roots appear in 2 to 4 weeks under the right conditions — and are the best choice for cane begonias and wax begonias. Leaf cuttings produce more plants from a single parent leaf and are the preferred method for rex and rhizomatous begonias, where a large leaf can yield several new plantlets. Either method works; the right choice depends on what type of begonia you have and how many new plants you want.
The critical variable for success is temperature: begonia cuttings root best at 65 to 72°F (18-22°C). Below 60°F (16°C), rooting essentially stops. Below that threshold, a cutting will sit unchanged for weeks and then rot. This is the single biggest reason home begonia propagation fails — the cuttings were taken in fall or winter when the home environment is too cold, or the propagator didn’t use a heat mat.
Begonia Stem Cuttings: The Fastest Method
Stem cuttings are the fastest way to propagate cane and wax begonias. A healthy stem section with 2 to 3 nodes can root in as little as 7 to 14 days in water, with visible roots 1 to 2 inches long in 2 to 4 weeks at the right temperature.
- Select a stem: Choose a healthy, non-flowering stem with at least 2 to 3 nodes — the small bumps on the stem where leaves attach. Avoid very old, woody stems (which root poorly) and very soft, new growth (which tends to rot). The ideal cutting comes from the middle of a healthy cane — mature but still green and pliable.
- Cut below a node: Using a clean, sharp knife or scissors, cut the stem just below the lowest node you want to include. The node is where the root initials are concentrated — roots will emerge from the nodes, not from the internodal stem tissue. Cut at a 45-degree angle to increase the surface area for water uptake.
- Remove lower leaves: Strip the leaves from the bottom 1 to 2 nodes — these nodes will be buried or submerged and should not have leaves attached. Leave 2 to 3 leaves at the top of the cutting.
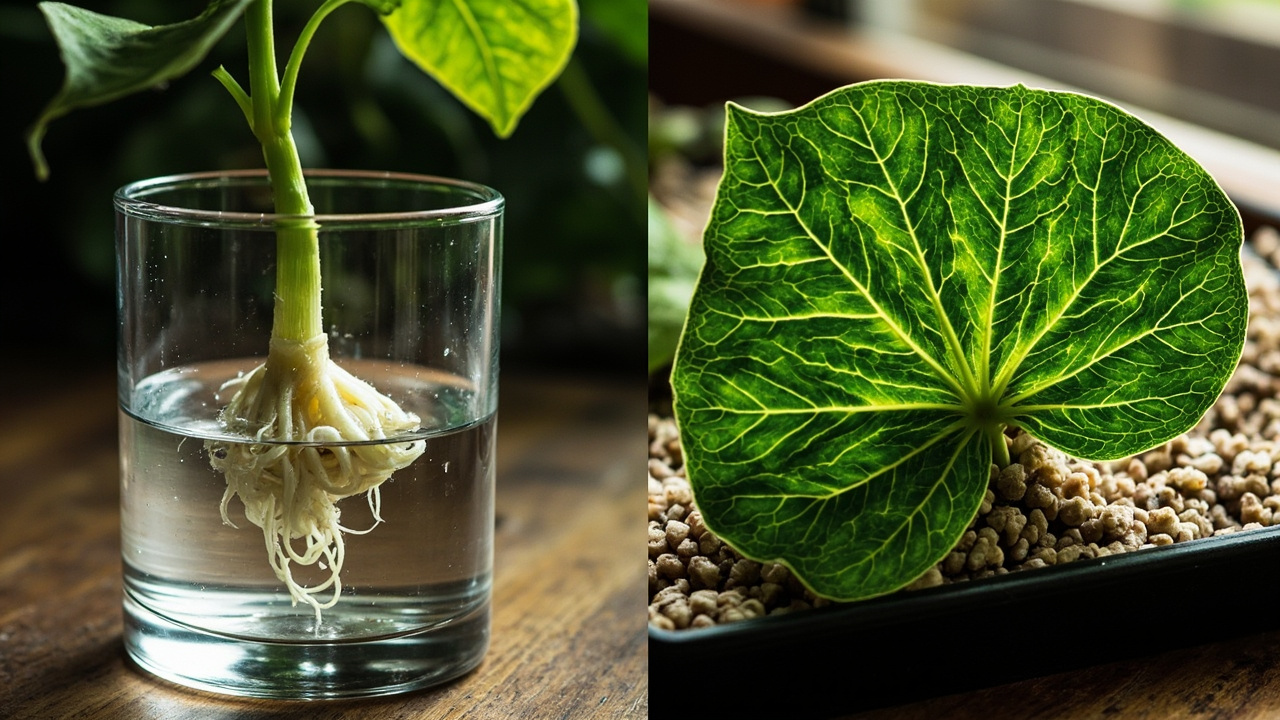
- Root in water or perlite: For water rooting, place the cutting in a clear glass or jar of fresh water with the nodes submerged but the leaves above the water line. Change the water every 3 to 4 days to keep it fresh. For perlite rooting, fill a small pot with moist perlite, make a hole with a pencil, insert the cutting’s cut end into the perlite, and firm gently. Keep the perlite barely moist.
- Wait for roots: At 65-72°F (18-22°C), expect first visible roots in water in 7 to 14 days. Allow roots to reach 1 to 2 inches before transplanting to soil. Cuttings in perlite typically root slightly faster because the better aeration prevents the anaerobic conditions that cause rot.
Rooting Medium: Water vs. Perlite vs. Moss
The medium you choose affects rooting speed, monitoring ease, and the amount of transplant shock when you move the cutting to soil.
- Water: The most visual and beginner-friendly option. You can watch roots develop in real time and know exactly when to transplant. Change the water every 3 to 4 days. The tradeoff: water roots are structurally different from soil roots (they’re adapted to underwater conditions) and the plant experiences some transplant shock when moved to soil. Reduce this by keeping the transition gradual — move the cutting to a small pot of moist soil and keep it covered with a loose plastic bag for the first week.
- Perlite: The preferred medium for serious propagation because it provides excellent aeration and drainage, preventing the overwatering and rot that commonly defeat water propagation. Roots in perlite develop as soil-type roots from the start, meaning less transplant shock. The downside: you can’t easily see the roots, so timing the transplant is less precise.
- Sphagnum moss: The best choice for leaf cuttings and for begonia types that prefer higher humidity during rooting. Moisten the moss until it’s damp but not dripping wet — squeeze out excess water — and use it to surround the cut end of the stem or the scored underside of a leaf cutting. Sphagnum holds moisture evenly and has mild antifungal properties that reduce rot risk.
Whichever medium you use, the common failure point is overwatering. Begonia cuttings have no root system to draw up water — excess moisture sitting in the medium causes the cut end to rot before roots form. This is especially common with water propagation where the jar isn’t changed regularly, and with perlite or moss that stays waterlogged.
For more on the watering and moisture conditions that support healthy root development, see the begonia watering and moisture needs guide.
Leaf Cuttings: More Plants from One Leaf
Leaf cuttings are the preferred method for rex begonias, rhizomatous begonias, and any begonia where you want to maximize the number of new plants from a single parent. One large leaf can produce multiple plantlets using the right technique.
There are two approaches:
Whole leaf method: Lay a healthy, mature leaf — cut from the parent plant with a short stem section — flat on the surface of moist perlite or sphagnum moss. Use small pins or stones to hold the leaf in contact with the medium, underside down. The leaf veins should be in contact with the moist surface. Roots and plantlets will emerge from the vein junctions. This method works well for most rhizomatous and rex types.
Wedge or vein-cut method: Using a clean sharp knife, cut the leaf into sections 2 to 3 inches wide, each containing a main vein. Lay each section cut-side down on the moist medium. The exposed cut vein tissue is where new plantlets will regenerate — this method produces more plants from one leaf than the whole-leaf approach. The Royal Horticultural Society recommends nicking the main veins on the underside of rex begonia leaves before laying them flat for propagation.
With either method, maintain high humidity around the cutting — a loose clear plastic bag over the pot creates a simple humidity dome without being airtight. Keep the medium moist but not waterlogged, and maintain 65-72°F (18-22°C). Rex and rhizomatous leaf cuttings take longer than stem cuttings: expect 4 to 6 weeks for the first plantlets to appear, and up to 6 to 8 weeks for some varieties.
Once the new plantlets have 2 to 3 leaves of their own and visible roots, they’re ready to be separated from the parent leaf cutting and potted individually.
For a guide to begonia types and which propagation method works best for each, see the begonia varieties and types page.
Aftercare: Humidity, Light, and the Transition to Soil
Getting a cutting to root is only half the job — the transition to soil is where many propagated begonias struggle. New roots, whether from water or perlite, need time to adjust to soil conditions.
Humidity: Freshly transplanted cuttings lose water through their leaves faster than their new root systems can supply it. A humidity dome or loose plastic bag over the pot for the first 1 to 2 weeks dramatically improves survival rates. Gradually remove the cover over the course of a week — this hardening-off process teaches the plant to tolerate average household humidity.
Light: Newly rooted cuttings want bright indirect light — not direct sun, which will transpire them faster than their limited roots can supply. An east-facing windowsill or a spot 2 to 3 feet back from a south/west window is right. In too little light they’ll etiolate (stretch for light) immediately; too much and they’ll wilt from water loss.
Watering: Keep the soil lightly moist during the establishment period — damp like a wrung-out sponge, not saturated. Overwatering is the most common post-transplant killer because the small root system can’t process large volumes of water. Check the soil with your finger before watering.
Transplant shock: A brief pause in growth after transplanting is normal — 2 to 3 weeks of apparent inactivity before new leaves appear. This is the root system adjusting to soil conditions. As long as the cutting isn’t wilting persistently or turning black, it’s fine. Don’t fertilize until the plant is showing active new growth.
For more on caring for newly propagated begonias through their first season, see the begonia care after propagation guide.
Why Propagation Fails: Common Mistakes
Most begonia propagation failures follow a handful of predictable patterns. Knowing what to watch for lets you intervene early, before the cutting is lost.
- Rotting before rooting: The cutting turns black and mushy at the base before any roots form. This is caused by overwatering, cold temperatures, or using old/woody material. If the jar isn’t changed every 3 to 4 days in water propagation, bacterial growth will overwhelm the cut end. Prevention: use fresh water, maintain warmth, and use a well-draining medium for soil-based rooting.
- Wilt without rooting: The cutting wilts even though the soil is moist. This usually means the cutting is transpiring faster than it can supply water — either because it’s in too much direct sun, the humidity is too low, or the cutting was taken from a flowering stem (which diverts its energy to the flower rather than root development). Move to lower light, raise humidity, and make future cuttings from non-flowering stems.
- No sign of life for weeks: The cutting sits unchanged for 6 weeks or more. If it hasn’t rotted and hasn’t rooted, it’s likely just too cold. A heat mat raising the temperature to 65-72°F (18-22°C) often kickstarts stalled cuttings within a week or two.
- Cutting produces roots but no leaves: This happens when the cutting was taken too high on a cane — it has roots but the growing tip is missing. The roots sustain the cutting but there’s no meristem tissue to produce new leaves. Always include a growing tip or node with at least one dormant bud when taking stem cuttings.
Patience is part of the skill. Begonia propagation doesn’t produce visible results overnight — the action happens below the soil or water line where you can’t see it. Check weekly, trust the temperature and humidity conditions you’ve created, and resist the urge to tug on the cutting to see if it’s rooted. If the cutting looks healthy and firm after 3 to 4 weeks, it’s working.
For help diagnosing what went wrong when a begonia cutting fails, see the begonia problems and diagnosis page.
Propagation by Begonia Type
Different begonia types propagate most successfully with different methods. A brief rundown:
- Cane begonias (angel wings, superba): Stem cuttings are fastest and most reliable. Cane types root in 5 to 14 days in water or perlite at the right temperature. A single healthy stem can yield 3 to 5 new plants per year with regular harvesting.
- Rex begonias: Leaf cuttings only — either whole leaf or wedge method. Rex stems don’t root reliably; the leaf tissue has to regenerate the whole plant. Expect 4 to 8 weeks for plantlets to appear.
- Rhizomatous begonias: Leaf cuttings work well, as does division of the rhizome itself (cut a section of the rhizome with roots attached and pot it separately). Division is faster than leaf cuttings for rhizomatous types.
- Wax begonias (Begonia semperflorens): The easiest begonia to propagate — stem cuttings root in as little as 5 to 7 days in water. Very forgiving of less-than-ideal conditions.