Orchid after bloom care comes down to a six-step reset that takes eight to twelve months to produce a rebloom. The plant is not dying when the last flower drops; it is shifting into a rest-and-rebuild cycle that, if you let it run, produces a fresh spike from the base and a new round of blooms.
The reason the rule exists is the orchid’s biology. The bloom cycle is energy-expensive — the plant poured weeks of photosynthate into producing flowers, and now it needs to rebuild root mass and leaf surface before it can afford another spike. The six to eight weeks right after the bloom drops are a vegetative phase, not a rest in the human sense. The plant is still photosynthesizing, still using water and fertilizer, just not producing flowers. The care rhythm does not pause; it shifts slightly toward recovery.
The rest of this article walks through the six-step reset: the spike cut decision, the inspection and repot move, the watering and light reset, the fertilizer rhythm, the realistic eight-to-twelve-month timeline, and the two failure modes that need intervention. For the broader care context, our orchid care for beginners guide covers the full set of decisions, and the timing below assumes a healthy Phalaenopsis in a normal home environment.
What The Plant Is Doing Right Now
The orchid has shifted from reproduction mode to vegetative mode. The flower spike is still present and still photosynthesizing (spikes contain chlorophyll), the leaves are still actively producing energy, and the roots are growing or starting to push out new tips. The plant is alive and working — it has just stopped spending energy on flowers.
What the orchid is not doing: it is not dormant in the way a deciduous tree is dormant. The leaves stay green, the roots stay active, and the plant responds to light, water, and fertilizer across the whole year. The “rest period” is really a six-to-eight-week window of slow growth, not a pause.
The visible signals of healthy post-bloom recovery are a new leaf emerging from the crown within four to eight weeks, firm green roots with white or green tips, and a steady posture (no wilting, no yellowing). If the plant is producing all three, the reset is working and the rebloom will follow. For the broader rebloom path through the year, the light and watering rules below are the upstream drivers.
The Spike Cut Decision
The flower spike can stay or go, depending on its state. There are three cases, and the right move differs for each.
The first case is a green, healthy spike with no brown tip. The right move is to leave it alone. A healthy green spike will often push out a secondary spike from one of the nodes within eight to twelve weeks, producing a smaller second bloom. The cut is optional and only useful if the spike is getting in the way or if you would rather the plant focus on a full year of leaf growth before the next spike.
The second case is a green spike with a brown, dried-out tip. The right move is to cut the spike about an inch above the highest healthy node, using clean sterilized shears. The brown tip will not recover and the plant will eventually abort the rest of the spike if left alone. The cut redirects the plant’s energy to root and leaf growth instead of trying to push a half-dead spike to rebloom.
The third case is a fully brown, shriveled spike. The right move is to cut it at the base, about an inch above where it joins the plant. The spike is dead and the plant will shed it naturally over the next few months, but cutting it now redirects energy and keeps the plant looking clean. Use sterilized shears and let the cut dry for an hour before watering.
The keiki option: on a healthy green spike, the plant sometimes produces a keiki — a small plantlet — at one of the nodes, instead of a secondary spike. The keiki grows its own roots and leaves over six to twelve months and can be removed and potted once it has roots at least two inches long. Keikis are a free backup orchid, not the main rebloom path. If you would rather have a fresh full spike from the base, cut the green spike to the second node and the plant will usually skip the keiki and push a new spike from the crown within a year.
Step-By-Step: The Six-Week Reset Procedure
The first six weeks after the last bloom drops are the active reset window. The procedure is six steps, and skipping one usually shows up as yellowing leaves or root rot within a few months.
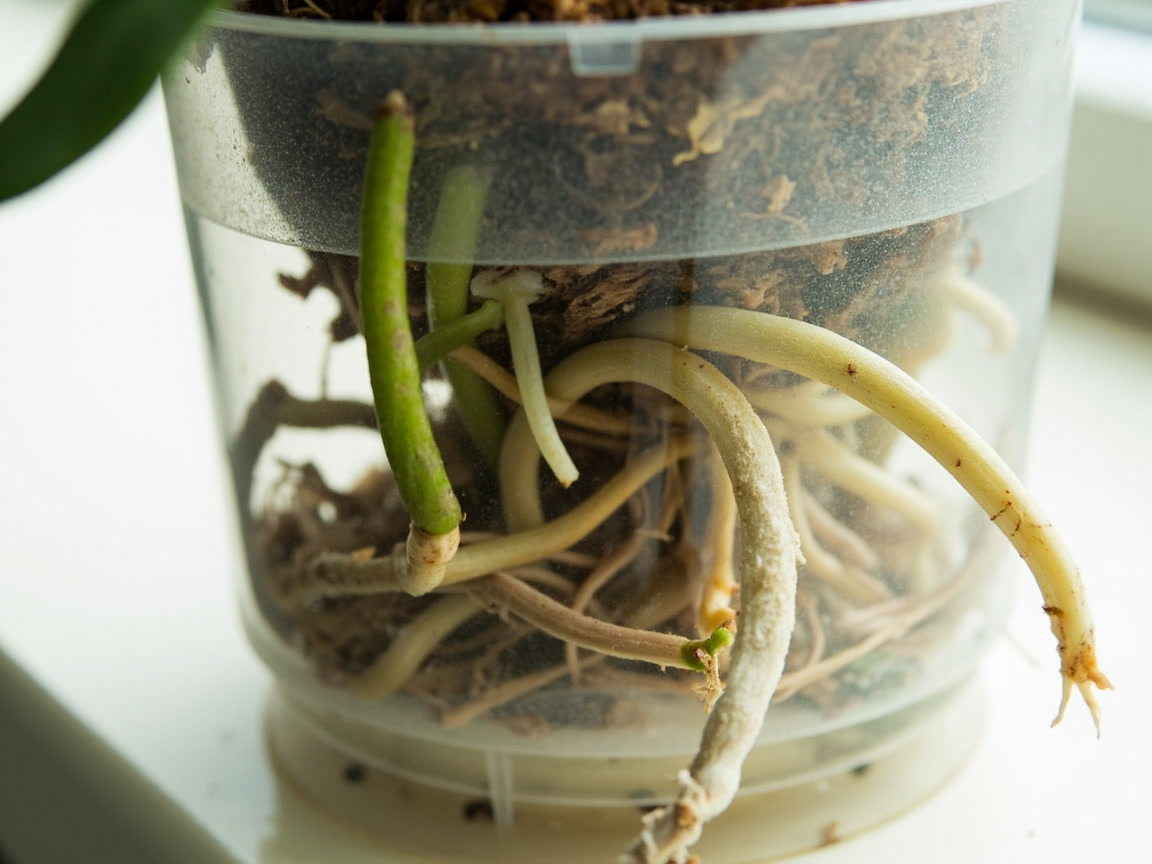
- Inspect the roots through the clear pot. Healthy roots are firm and white, green, or silver. Rotted roots are brown or black and mushy.
- Trim dead or rotted roots with sterilized shears. Cut back to firm white or green tissue. A healthy root system can lose up to 30 percent of its mass during a reset without long-term harm.
- Check the bark. If it has broken down into a soil-like consistency, the plant needs repotting. If the bark is still chunky and airy, leave it.
- Repot only if the bark has broken down or the plant is root-bound. The full procedure is in our orchid repotting guide.
- Clean the leaves with a damp cloth. Dust blocks light and the leaves need full photosynthetic surface during the reset.
- Resume normal watering on the schedule the plant had during active growth. The bark dries out faster in fresh bark than in old bark, so watch the root color for two to three cycles to find the new rhythm.
The total time for this reset is six weeks. By the end, the plant should be producing a new leaf and the roots should be pushing out green or white tips. If neither happens, the post-bloom environment needs adjustment — usually a light or watering problem, both covered in the next two sections.
The Watering And Light Reset
The watering rhythm shifts slightly after the bloom drops. During active growth and bloom, the rhythm is once a week for most homes. During the rest period, the rhythm stretches to every ten to fourteen days because the bark is staying damp longer and the plant is using less water.
The visual signals stay the same. Silver roots are ready to water, bright green roots are not. The lift test still works. The full procedure is in our orchid watering guide, and the practical point is that the schedule is downstream of the plant’s visible activity. During the rest period, less is more. Overwatering during the rest is the most common post-bloom failure mode and shows up as yellowing lower leaves within four to six weeks.
The light does not change during the reset — the orchid still wants bright indirect light. What changes is the seasonal shift. Late summer to early autumn produces a natural light drop that triggers the rebloom cycle, and the plant needs that signal. Moving the orchid to a brighter spot during the rest period is fine, but moving it to a dimmer spot is a mistake — the plant needs the seasonal trigger to fire. The full light rules are in the orchid light requirements guide.
The honest trade-off: not every home produces a strong enough seasonal shift to trigger rebloom. A north-facing apartment or a basement room may not see enough light drop to fire the trigger, and the plant will produce only leaves for another year. The fix is a brighter spot for the autumn window or a grow light setup, both covered in the light guide.
Fertilizer After Bloom: When And How
The post-bloom fertilizer rhythm is steady but light. The right rule is to feed at half-strength on every other watering during active growth (spring through early fall), and at quarter-strength or not at all during the deep rest window (six to eight weeks after the bloom drops). The bloom-booster switch — a higher-phosphorus formula — comes in late summer as the spike begins to push out from the crown, and stops once the buds open.
The practical schedule: half-strength balanced fertilizer (20-20-20 or similar) on every other watering from March through August. Quarter-strength bloom-booster (10-30-20 or similar) on every other watering from September through November, then stop until the buds open. Resume half-strength balanced once the plant is back in active growth the following spring.
The honest trade-off: fertilizer brand matters much less than fertilizer timing. The big-box orchid fertilizer is fine; the expensive specialty blend is fine; tap water with a drop of fish emulsion is fine. The plant responds to the rhythm, not the formula. Missing the late-summer bloom-booster switch costs you a spike; switching to the wrong brand costs you nothing.
The light side of the equation is just as important as the fertilizer. A plant that gets enough light but the wrong fertilizer will still bloom; a plant that gets the right fertilizer but not enough light will not. The orchid light requirements guide covers the light side of the trigger.
The 8-12 Month Rebloom Timeline
The realistic rebloom timeline from the last bloom drop is eight to twelve months. The plant spends the first six to eight weeks in rest, pushes out a new leaf or two through summer, and then receives the autumn light trigger that fires a new spike. The spike emerges from the base of the plant in late autumn, grows slowly for two to three months, and the buds open in early to mid-winter.
The slow part is the spike. A new spike is visible as a small green mitten-shaped tip at the base of the plant in October or November. It grows about an inch a month through December and January, then starts producing buds in February. The buds open in March or April, and the flowers last another three to four months once they are open. The full cycle from bloom-drop to next bloom is therefore nine to twelve months, and trying to rush it (with extra fertilizer or grow lights on full intensity) usually produces a weak spike with fewer flowers.
If a plant has been healthy for more than a year and has not rebloomed, the most common cause is not enough seasonal light shift. The fix is moving the plant to a brighter room for the autumn window, or adding a grow light. A plant in steady, even light year-round may not receive a strong enough trigger. For the rescue path when the plant is in real trouble during the cycle — yellowing leaves, root rot, crown rot — the full protocol is in our save a dying orchid guide.
When To Worry: The Post-Bloom Failure Modes
The two post-bloom failure modes that need intervention are overwatering during the rest period and under-watering during active growth. Both show up as yellowing leaves, but the underlying cause and the right response differ.
Overwatering during the rest period produces yellowing lower leaves and soft brown roots visible through the clear pot. The right response is to stop watering for two to three weeks, lift the orchid out of its pot, trim the rotted roots, and repot into fresh bark if the old bark has broken down. The full diagnostic is in our orchid yellow leaves guide, and the rescue protocol is in the save a dying orchid guide.
Under-watering during active growth produces wrinkled, accordion-folded leaves and severely shriveled roots. The right response is a 20 to 30 minute soak in room-temperature water and a return to the normal rhythm. The plant will recover within a few weeks if the new rhythm is steady. If the leaves stay wrinkled after a month, the roots have died back and the plant needs more aggressive intervention.
The honest expectation: a healthy Phalaenopsis in a normal home produces a fresh spike every eight to twelve months. Two blooms a year is rare and usually means the plant is being pushed too hard. The right care is steady rhythm across the year, and the right expectation is one strong bloom cycle that lasts three to four months.
Turn PDF Bank Statements Into Workable Spreadsheets
Your bank statement is a mess of numbers, but your books shouldn't be. Use our converter to get Excel, CSV, or QBO files — ready for QuickBooks.