If you are growing tomatoes hydroponically indoors, the question of hydroponic tomato pollination is not optional — it is mandatory.
Unlike outdoor plants that rely on wind and insects, your indoor hydroponic setup sits in a sealed environment where neither bees nor breezes will do the work for you.
Without manual or assisted pollination, the flowers on your tomato plants will simply drop off without setting fruit, no matter how perfectly you have calibrated your nutrient solution or grow lights.
The good news is that tomato pollination in hydroponics is straightforward, takes only a few minutes, and once you understand the mechanics, it becomes a natural part of your weekly growing routine.
Do Hydroponically Grown Tomatoes Need Pollination?
Yes. Every tomato variety — whether you are running a deep water culture system, a nutrient film technique setup, or a simple DWC bucket on your kitchen counter — requires pollination to produce fruit.
This is not a hydroponics-specific problem; it is an indoor-growing problem.
Tomatoes are self-pollinating, meaning each flower contains both male and female parts, but the pollen still needs to travel from the stamens to the stigma for fruit set to occur.
Outdoors, this happens through wind vibration and visiting bees. Indoors, you are the wind and the bee.
Once you accept that responsibility, the actual process is simple and highly effective when done consistently.
How Tomato Pollination Works
Tomato flowers are engineered for self-pollination, but they need a trigger to release the pollen.
In nature, this trigger is physical vibration. A bee landing on a flower causes the bloom to vibrate at a specific frequency, shaking pollen loose from the anther cone and onto the stigma.
Wind does the same thing — a gentle but consistent breeze flexes the flower stems and shakes loose the pollen.
The moment pollen contacts the stigma, fertilization begins and the fruit starts to develop.
In your hydroponic hydroponic tomato farming setup, you are replicating that vibration by hand, and for most indoor growers, doing it once daily during peak flowering produces excellent results.
Indoor Environment Challenges
The moment you move tomato plants indoors, you lose two critical pollination agents: moving air and insects. Even if your grow room has a ventilation fan, it rarely creates the focused, gentle air movement that mimics a breeze across flower clusters.
Ceiling fans, if present, often blow too broadly and at the wrong angle to affect flowers tucked beneath the canopy.
Insects are simply absent in an indoor hydroponic environment, and while that is a blessing for pest management, it means every single flower requires your direct attention during the blooming period.
Another challenge specific to hydroponic environments is humidity control. Indoor spaces with active hydroponic systems can run excessively humid, especially in enclosed grow tents.
When humidity exceeds 70 percent during flowering, pollen can become sticky and clump rather than falling freely.
Balancing ventilation, air circulation, and humidity creates the conditions where your hand pollination efforts will be most effective.
Hand Pollination Techniques
There are three reliable methods for pollinating tomato flowers by hand, and each works well depending on the scale of your setup and your personal preference.
Finger Tap Method
The simplest approach requires nothing but your fingertip. Gently flick or tap the base of each open flower — the part behind the petals where the flower attaches to the stem — using a light, sharp motion.
You are looking to replicate the vibration frequency that a bee would produce. Each flower needs three to five firm taps. You will often hear a subtle sound when the vibration is right — a small puff of pollen becoming visible at the anther tip.
Work your way through every open flower every day during the flowering period. This method works best for small setups with fewer than twenty flowering plants.
Electric Toothbrush Method
An electric toothbrush produces the perfect vibration frequency for tomato pollen release, and it is the technique most frequently recommended by experienced indoor growers.
Place the vibrating toothbrush head against the base of each flower for two to three seconds. The bristles and oscillating motion shake pollen loose far more effectively than finger tapping.
This method is especially useful for larger plants with dense flower clusters where individual finger tapping becomes time-consuming.
Use a clean toothbrush dedicated exclusively to your plants, and replace it every few months to maintain hygiene.
The toothbrush method is particularly effective because it reaches deeper into the flower structure and consistently triggers pollen release across the entire anther cone.
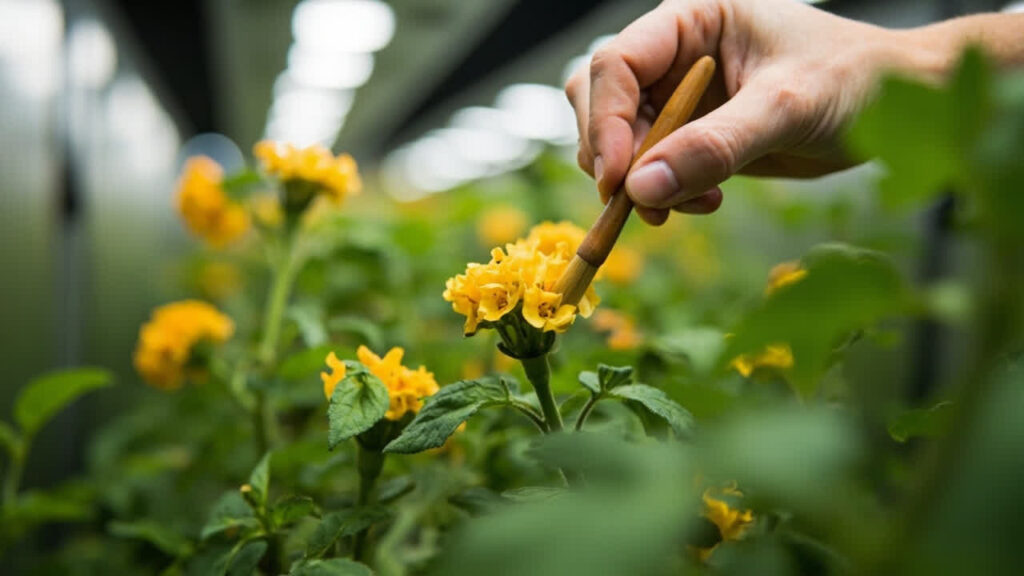
Paintbrush Method
A small, soft artist’s brush — a watercolor or detail brush with natural bristles — physically transfers pollen from the anthers to the stigma.
Insert the brush gently into the center of an open flower and rotate it lightly to collect pollen, then move to the next flower and deposit that pollen against the stigma.
This method mimics what a bee carries on its body and is the most thorough of the three options. It takes longer than tapping or vibrating, but it is highly accurate and works well for growers who have only a handful of plants or who are selectively pollinating the first clusters on each plant to ensure the earliest, strongest fruit set.
Clean the brush between plants if you are working with multiple varieties to avoid cross-contamination, though this matters less if you are growing a single variety.

When to Pollinate — Timing Flowers Correctly
Timing matters. Tomato flowers open in the morning and are most receptive between 9 AM and 11 AM. During this window, the pollen is at its freshest and the stigma is most receptive.
Attempting to pollinate in the evening yields poor results because pollen viability declines throughout the afternoon.
If your grow lights are on a timer and your lights come on at 7 AM, wait until at least two hours after the lights activate before you begin pollinating.
Pollinate daily while flowers are open and showing bright yellow petals. Once a flower begins to fade — petals curling back or losing color — pollination will no longer be effective.
Check every plant every day during the flowering period. A flower that is open for three to five days without pollination will drop, and by the time it drops, you have lost that cluster’s first chance at fruit set.
New flowers will open, but early clusters produce the strongest, earliest fruit, so your daily attention in the first two to three weeks of flowering has the greatest impact on your overall harvest timing.
Signs of Successful Pollination vs. Flower Drop
After a flower has been successfully pollinated, you will notice the petals beginning to curl backward and the base of the flower — the calyx — starting to swell within two to three days.
Within a week, a small green fruitlet will be visible at the center of the flower cluster, steadily growing. This is your confirmation that pollination succeeded.
A flower that has not been pollinated behaves differently. The petals fade from yellow to a pale cream color, the flower stem yellows, and the entire bloom detaches from the cluster within three to five days of opening.
You will find these aborted flowers on the floor of your grow tent or on the surface of your hydroponic reservoir.
If you see this pattern recurring, it is a clear signal that your pollination routine needs improvement — either the technique is inconsistent, the timing is wrong, or the environmental conditions are preventing pollen viability.
Occasionally, a flower will set fruit but the fruit later develops a dark patch or crease at the base and stops growing. This is a pollination failure that occurred partially — the ovules were partially fertilized but not completely. Known as “cat-facing,” this condition is more common when temperatures swing widely during the pollination window, and it is worth monitoring even when you have been diligent about hand pollination.
Environmental Factors That Affect Pollination Success
Hand pollination techniques only work well when the surrounding environment supports pollen viability. Temperature and humidity are the two dominant factors.
Tomato pollen is viable and fertile between 18°C and 29°C (64°F to 84°F).
Above 32°C (90°F), pollen viability drops sharply and flowers can become sterile even if you pollinate them.
Below 15°C (59°F), pollen release becomes inconsistent and fruit set slows considerably.
If your grow room runs hot — common under high-intensity grow light spectrum lighting — schedule your pollination for the coolest part of your day and consider adding airflow to moderate canopy temperature.
Relative humidity between 50 and 65 percent keeps pollen dry and loose, allowing it to fall freely when vibrated.
Above 70 percent, pollen clumps and fails to travel. Below 40 percent, pollen can dry out before it reaches the stigma.
If your grow tent or room is consistently outside this range, adjusting your ventilation, dehumidifier, or humidifier will have a more direct effect on your harvest than any amount of hand pollination effort.
Nutrient availability during flowering also influences pollen quality. Your hydroponic nutrients solution should include adequate calcium and micronutrients at this stage, as deficiencies during fruit set can cause blossom end rot even on properly pollinated flowers.
Keep your nutrient EC within the recommended range for the flowering stage and avoid the temptation to “push” growth with high-nitrogen formulas, which encourage foliage at the expense of flowers and fruit.
Common Mistakes That Cause Flower Drop
The most frequent cause of flower drop in indoor hydroponic tomato gardens is simply inconsistent pollination.
Some growers pollinate for two or three days, see no immediate result, and stop. But tomato pollination is a daily commitment during the flowering window. Missing even one day during peak bloom means a portion of your flowers go unpollinated and drop.
Build it into your routine as reliably as checking your reservoir level.
Overwatering and nutrient overconcentration cause stress that leads to flower abortion even when pollination is technically successful. Your plants cannot divert resources to fruit development if they are still recovering from root stress.
Keep your reservoir properly aerated, monitor your EC readings, and ensure root zone temperatures stay in the 18°C to 22°C range to support healthy nutrient uptake throughout the flowering period.
Another mistake is pollinating too late in the flower lifecycle. Once a tomato flower has been open for more than four days, its receptivity drops significantly even if it has not yet dropped.
Prioritize the freshest, brightest yellow flowers first, and do not waste time on flowers that are already starting to fade. Focus your effort on the flowers that will give you the strongest fruit.
Finally, be cautious about using any spray products near your tomato plants during flowering. Even organic pesticides or foliar sprays designed for other crops can disrupt pollen viability or damage delicate flower structures.
If you need to apply any treatments, do so in the evening after pollination is complete, and avoid spraying directly on open flowers.
Hydroponic Tomato Pollination
The hydroponic tomato pollination phase of your indoor tomato grow is brief but consequential.
Spend five to ten minutes each morning tapping, vibrating, or brushing your way through every flowering cluster, maintain stable temperature and humidity, and keep your nutrient solution properly balanced.
In return, you will watch those small green fruitlets swell into full, truss-ripened tomatoes that you grew entirely by hand — and that is a satisfying result worth the daily attention.